How to fix the Windows update error code 0x80070643 due to the partition and finish the updates?
Today, while noticing my Windows 10 Pro was slow, i check the Windows update status and saw that Windows 10 update had the error code 0x80070643, due to recovery partition size. The full exact error message displayed by Windows 10 is this one:
There were some problems installing updates, but we’ll try again later. If you keep seeing this and want to search the web or contact support for information, this may help: (0x80070643)
And the Retry option is displayed in stead of the Search for updates one.
Table of Contents
1. How to reproduce the Windows update error 0x80070643 ?
To reproduce it, open your Windows Update window, to do so, first option:
- Use the shortcut Windows + I
- Select the Update & Security menu
- Then select Windows Updates tab
Second option to open the Windows Updates screen without shortcut:
- Open a Windows Explorer window
- On the top menu, select the Open Settings button
- Select the Update & Security menu
- Then select the Windows Updates tab on the top right of the screen
2. Symptoms and step by step solution of the 0x80070643 Windows update error code
In more detail, when selecting Retry the update starts installing but is stuck at 0% progression.
2024-01 Security Update for Windows 10 Version 22H2 for x64-based Systems (KB5034441)
Status: Installing – 0%
To achieve this, simply follow all the following these steps.
Warning : Make sure to delete the second system partition and not the primary with all your data. Also make sure you know exactly what you do to avoid breaking your System.
3. Check recovery partitions used by Windows update with disk management
Follow these steps to check how much space is available and to see how much more space to allocate for the EFI recovery partition:
- Click on the Windows button, or use the Windows + I shortcut to open the settings
- Type : Create and format hard disk partition
- It will open the Disk Management Windows tool
The tool will simply let you check visually the disks and partitions on your system, so it is much more easy to understand.
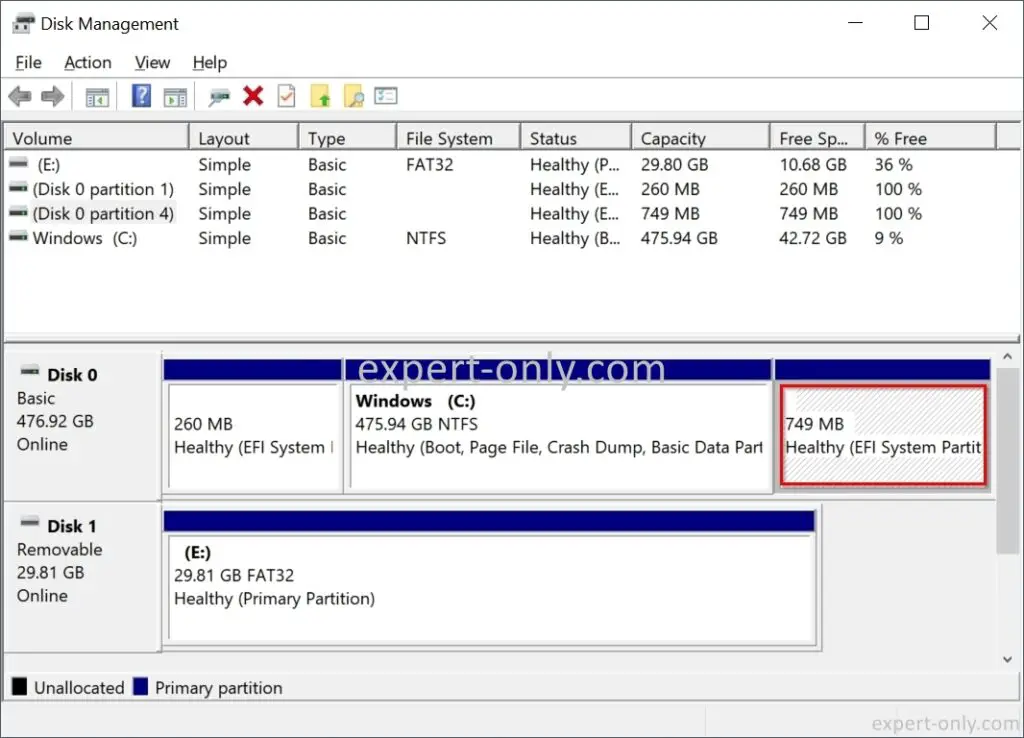
4. Shrink partition to free disk 250 Mb space
We want to make the new partition bigger, let’s say by adding 250 Mb to the existing size.
First, how to open the command prompt as an administrator using 2 different ways:
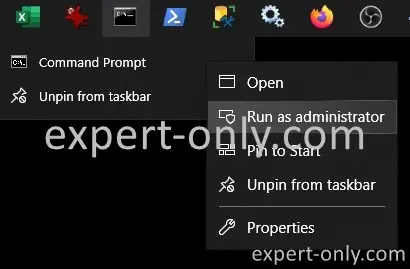
If your command line shortcut is pinned to your taskbar:
- Do a first right-click on the icon
- Then a second right-click on Command Prompt
- Select then Run as administrator
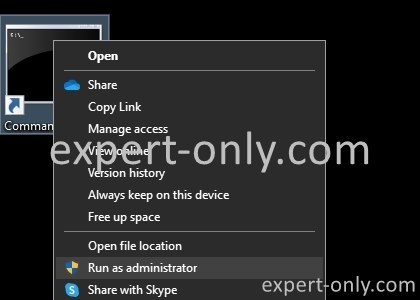
If you have a shortcut on your Desktop:
- Do a right-click on the Command Prompt shortcut
- Select then Run as administrator
4.1 Option 1: using the diskpart cmd tool
- Open the command line as administrator
- Type diskpart
- List all the volumes this time with list volume
- Select the volume to resize: select volume 0
- Shrink the selected volume by 250 MegaBytes: shrink desired=250
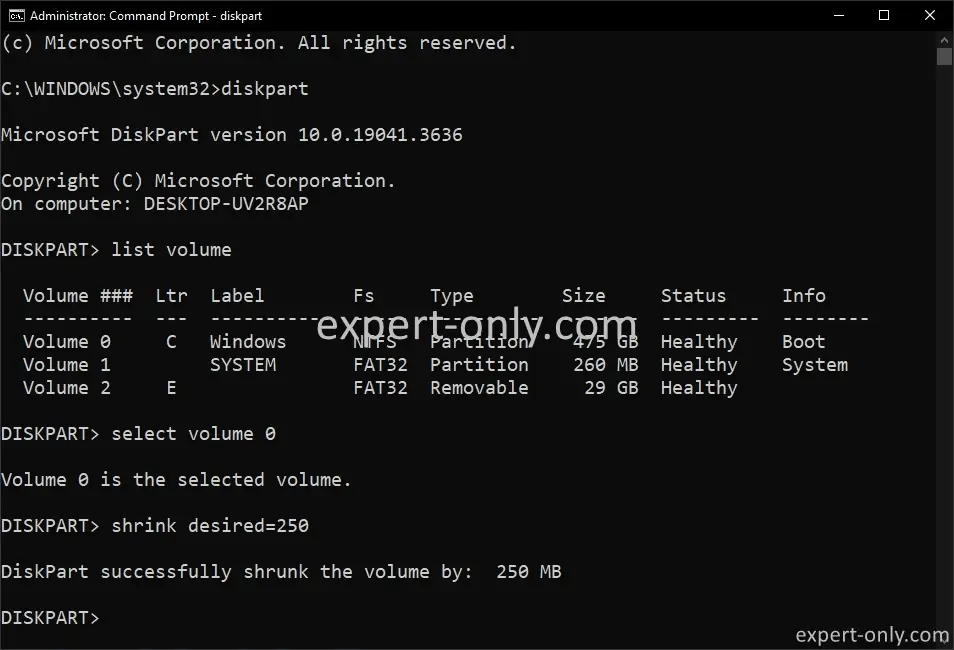
We have 250 megabytes of additional free space, we need now to create a new one.
4.2 Option 2: using the disk management tool
To shrink the main windows partition, you can also do it without any cmd line script.
- Open the Disk Management tool
- Right-click on the partition to shrink
- Select Shrink Volume
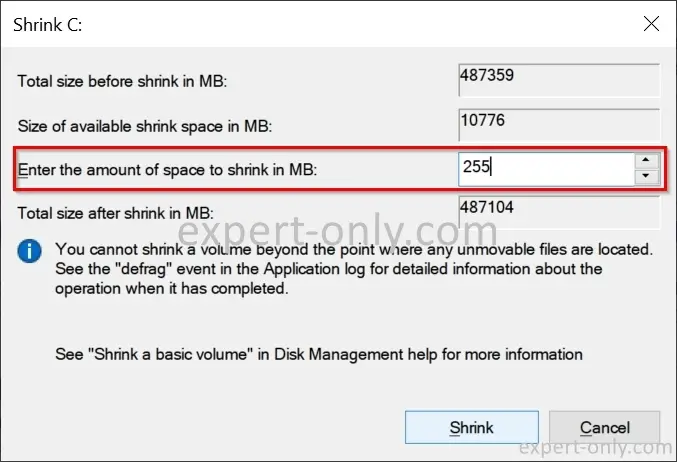
- Enter the need disk space to reclaim in MegaBytes, here it is 255 Mb
5. Select recovery partition too small for Windows update
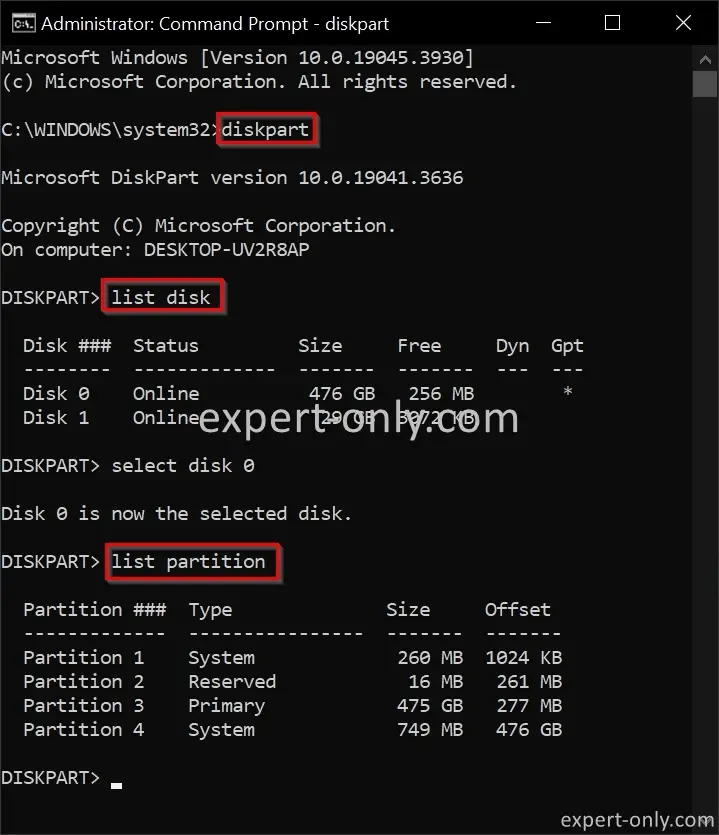
To delete the current recovery partition that do not have enough space, use these command line scripts:
- Open the Windows command prompt
- To open the DISKPART.exe tool, type diskpart
- List all the disks with list disk
- Select the disk to work on : select disk 0
- Display a list of the partitions from this disk: list partition
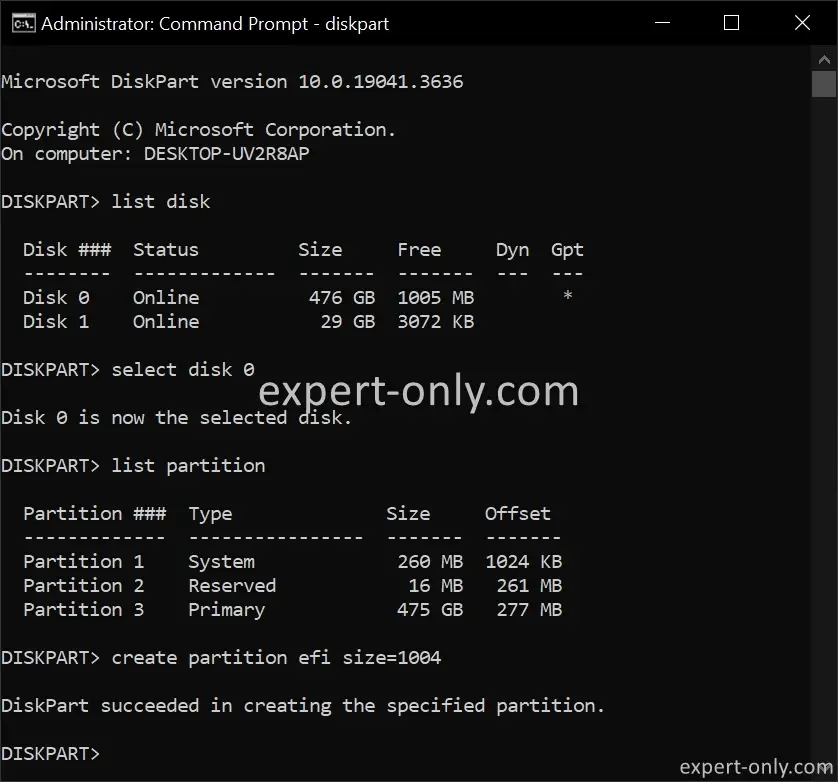
Using Windows command line and diskpart to list disks and select a partition
6. Delete Current Windows recovery partition too small that causes 0x80070643 error
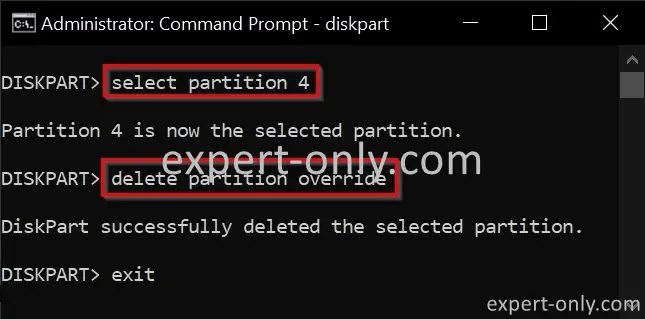
Once we have listed the partitions from the disk, we select one partition and we delete it.
Warning : Make sure to delete the second system partition and not the primary with all your data.
- Select the partition: select partition 4
- Optional step, check the partition details: detail partition
- Then delete the selected partition: delete partition override
- Check the remaining partitions: list partition
- Close the diskpart tool : exit
At this stage, the Windows failing update should work properly now. You can try to resume your Windows 10 updates.
However we juste deleted a recovery partition! In fact this not a full Windows system image but a recovery partition used mainly by Windows Update in case something goes wrong and it need to rollback some changes made.
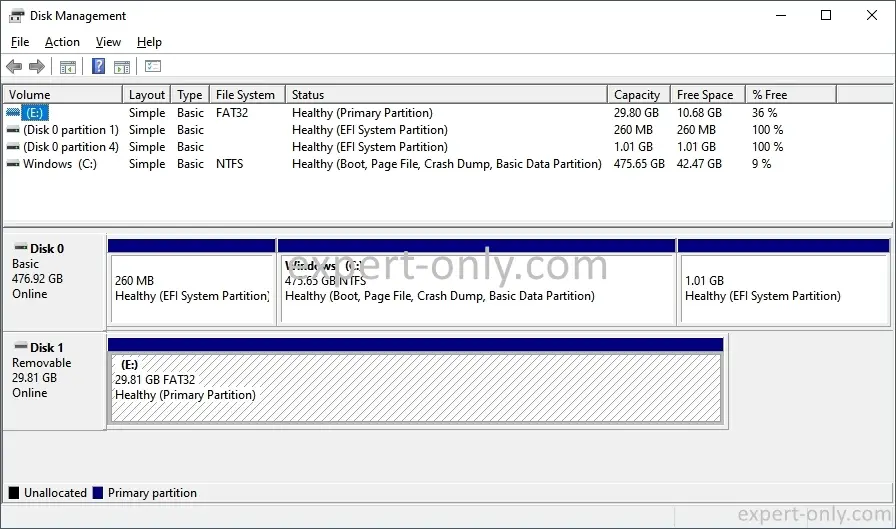
Using the disk Management tool, the current situation is that we have 1.05 Gb of unallocated space, and more exactly 1004 Mb (check this number using Right-Click and new simple volume option on the unallocated space).
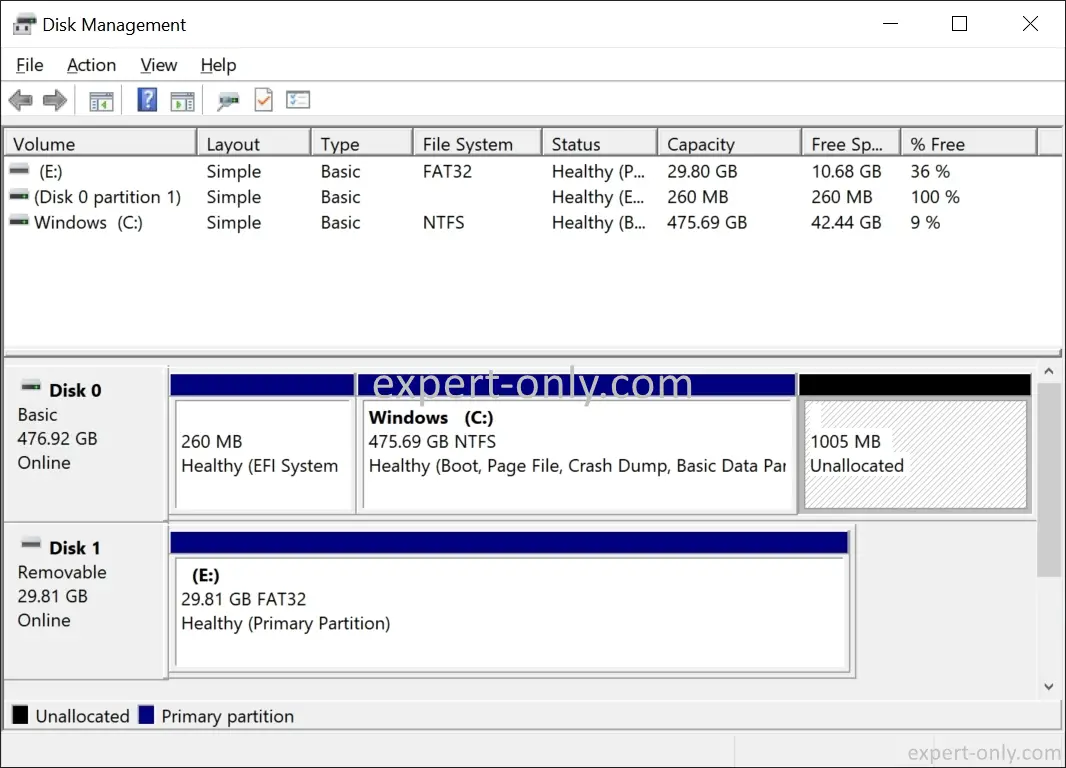
And more exactly 1004 Mb, to check this number, using the disk management tool, Right-click on the unallocated space and select New Simple Volume, it will then display the maximum disk space available in Mb, here it is 1039 MegaBytes.
7. Create a bigger Windows Recovery Partition using diskpart
This commands will guide you to create an EFI System Partition abbreviated as ESP that can be used by the system as Windows Recovery partition.
- First open Command Line as Administrator
- To do so, Right-click on the command line shortcut
- Select Runs as administrator
- To open the DISKPART.exe tool, type diskpart
- List all the disks with list disk
- Select the disk to work on : select disk 0
- Display a list of the partitions from this disk: list partition
- Create an EFI system partition (abbreviated as ESP) with a size of 1004 MegaBytes: create partition efi size=1004
- Finally close the diskpart.exe tool : exit
If you open now the disk management, you cam see that the EFI system partition is a 1Gb partition.
That’s it for the Windows 10 update partition error 0x80070643 fix linked to the KB5034441 update.


was this just an example? your partition shows 1gb already and most reports indicate 750mb should be sufficient ?
I have several laptops that are failing with the 0x80070643 error and their WinRE partitions are 544mb / 640mb / 522mb.
they are all core2duo based.
I have one with 577mb WinRE partition that updated correctly, it was I5 based.
All of these laptops were fresh Win7 updated to Win10 or Win10 installs [ non oem ] with similar sized WinRE partitions.
Is it possible to use the win disk mgmt to shrink the “C” volume and then extend the WinRE volume?
not much on them, all were strays that I rehabbed with SSD’s and more RAM.
Hi, Yes indeed it was just an example.
Just reworked the full article to be more explicit with real sizes! Juste had to resize as the old partitions were.
I just fixed my laptop before creating the blog post, I had indeed around 750 Mb. I’m running Windows 10 Pro and it is also an i5.
After deleting the recovery partition and/or having a partition larger than 1Gb, the update is working smoothly again.
To answer the second question, you would need to install a third party software, using only the disk management it is not possible to create ESP partitions.
You can download and install the AOMEI Partition Assistant 10.2.2 free version software to make it using a GUI. Or you can use and adapt the diskpart commands.
Hope it helps.