You have a CSV file you need to load into a SQL Server database? We’ve got you covered with this step by step guide, perfect for simplifying your data work. Using SSIS, you can easily import data from CSV a file into a SQL Server table using one package.
CSV files are great for all sorts of data, like customer lists or sales figures. With our guide, you’ll use Microsoft SSIS and Visual Studio 2019 to make this process easier.
We’re going to walk you through 10 essential steps to import your data smoothly and effectively. Each step is easy to follow, ensuring you can get the job done, no matter your skill level.
Here are the 10 simple steps to import CSV data into a SQL Server using SSIS:
- Prepare Your CSV File: Get it ready for SSIS.
- Set Up Your SQL Server Table: Ready your database with SSMS.
- Create Your SSIS Package: We’ll show you how, step by step.
- Connect to Your CSV: Link up to your data source.
- Adjust Your Columns: Fine-tune the details.
- Fix Column Types and Lengths: Make sure everything matches up.
- Convert Data as Needed: Use SSIS tools to tweak data.
- Point to Your SQL Server: Set up where your data will go.
- Run the SSIS Package: Import your CSV with confidence.
- Check Your Imported Data: Make sure it’s all there and correct.
We’ve split the process into two parts: first, preparing and connecting your CSV file, and second, setting up your SQL Server table and importing the data. This guide is all about making your data import as straightforward as possible. Let’s get started and make your data work for you!
Let’s check first a few requirements
First of all, to import CSV data files into a SQL Server table using an Integration Services package, let’s check a few mandatory prerequisites:
- Be able to connect to an existing database or create a new SQL Server database with SSMS
- Install Visual Studio and the SSIS projects extension for the package development.
Table of Contents
1. Prepare the CSV source file to import with SSIS (Premium)
Indeed, to start the tutorial and import CSV data into a SQL Server database using SSIS, you must follow this first step. Simply start by downloading the file used in the example and then create the target table to store the customers. The Customers_Data.csv file contains 49 rows, consisting of one header row and 48 rows of automatically generated data.
To download the resources: Flat file and query, enrol in our Full SSIS Video training.

2. Prepare a target SQL Server table with SSMS (Premium)
The purpose of this SSIS package is to import the 48 rows from the CSV flat file into the SQL Server Customers table without errors. The creation code of the table is available on our SSIS training on Udemy. Execute the code in a sandbox or a development database using SSMS on Windows..
To download the resources: Flat file and query, enrol in our Full SSIS Video training.
3. Create the SSIS import package and the data flow
This step is about how to manage the connection to the flat file used as a source. This step is done using a simple SSIS data flow.
- Open Microsoft Visual studio 2019 and create a new SSIS project or open an existing project.
- Open an existing package to modify its content. Alternatively, right click and add a new package to the SSIS project.
Adding a traditional SSIS Data Flow
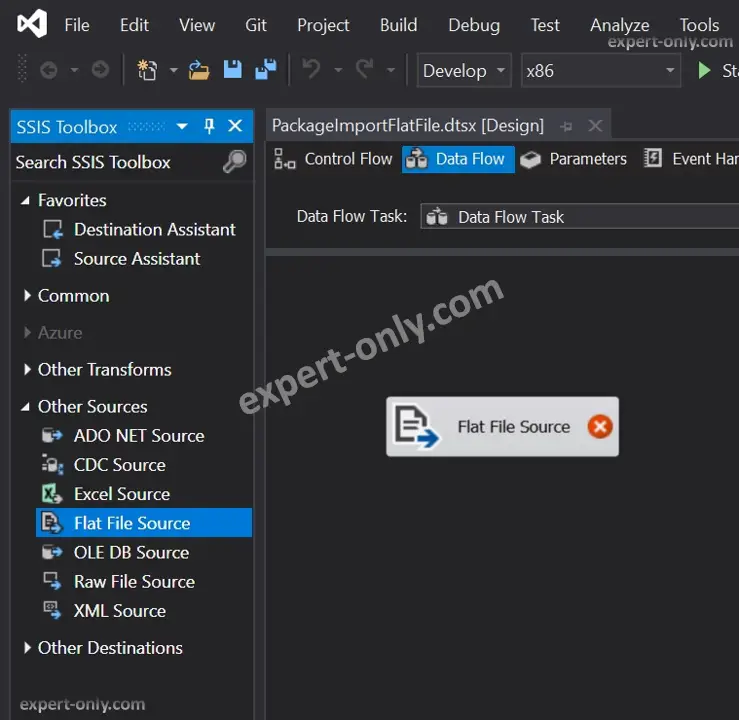
From the Visual Studio workspace, locate the SSIS toolbox on the left. Select Data flow Task and drag it onto the workspace and double click to open it.

In the SSIS Toolbox, now select the Flat File Source component and drag it onto the workspace. Then double click on it to open it and set it up.
Using SSIS variables to manage file paths
With SSIS, almost all components and properties can be set with variables. It is good practice to use variables to manage paths, connection strings and changing SSIS settings efficiently. Like changing environments from development to test or production for example.
4. Create an SSIS connection to the CSV data file to import
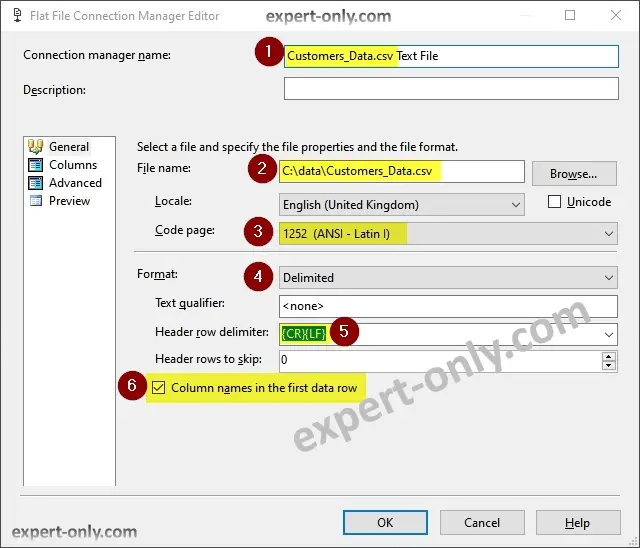
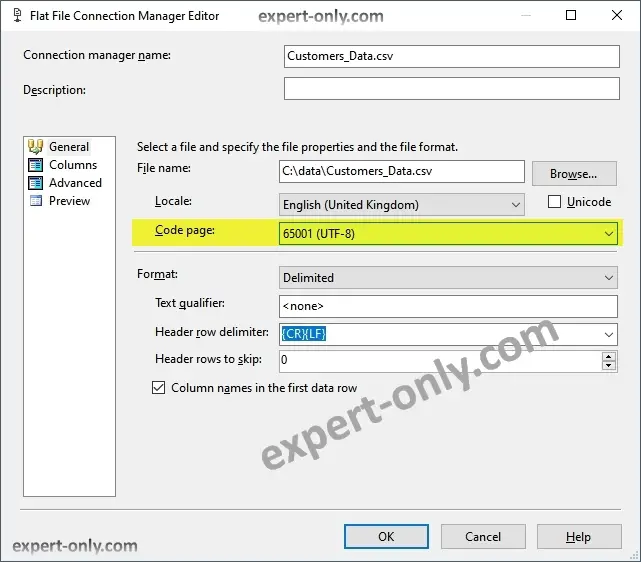
Create and configure a new flat file connection by selecting the following items:
- First, enter the name of the connection.
- Then the path of the file.
- Select the encoding of the file (code page).
- The format, in our case it is delimited.
- Check the delimiter at the end of the header (header row delimiter).
- If the column names are in the first line of the file
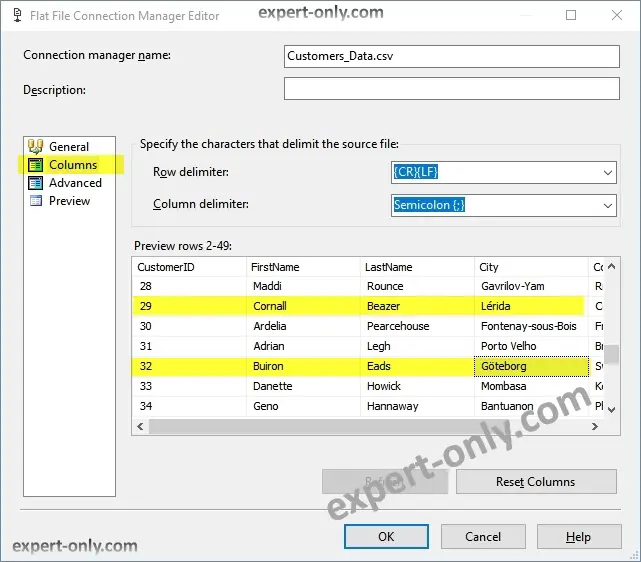
5. Set up columns to import in SSIS and check CSV file encoding
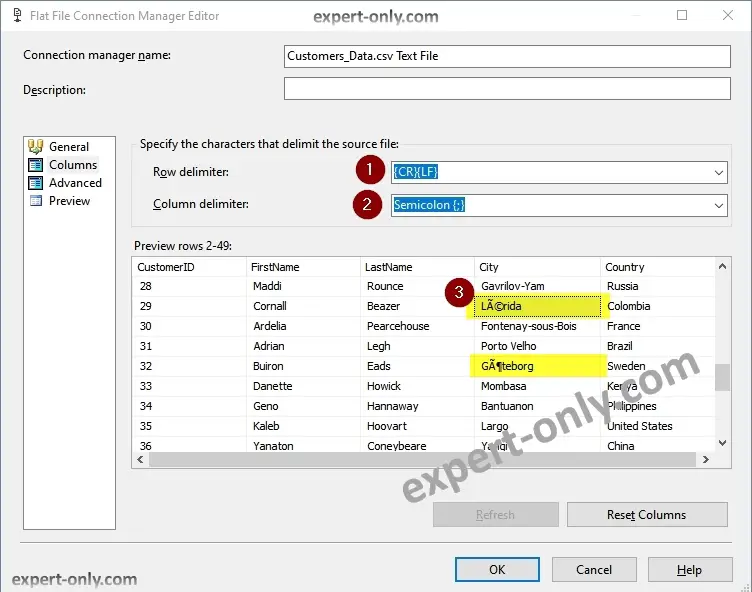
The goal here is very important, set up the columns and check the data:
- Validate or modify the row delimiter
- Choose the column delimiter, which is the character at the end of each line of data
- Check if the data and in particular the accents or special characters are displayed correctly. For example, lines 29 and 32 have an error because the accents are misinterpreted. The encoding must be changed.
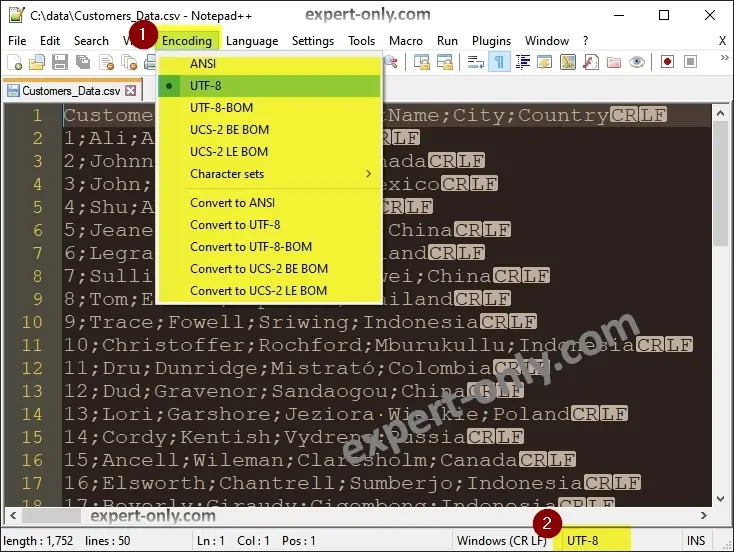
Use the right encoding for the text file using Notepad++
Change the encoding of the source file until the data is displayed correctly. To find the encoding of the file, simply use Notepad++ and open the file. There are 2 possibilities to check the encoding:
- From the Encoding menu
- At the bottom right of the software where information about the file is displayed.
Setting up the Flat File Connection Manager
To load the text file without errors, change the encoding and use 65001 (UTF-8) instead of 1252 (ANSI – Latin I) proposed by default by SSIS.
6. Adjust CSV file type and columns length in SSIS
After the selection of the correct encoding, click on the Columns tab again and check the data again.
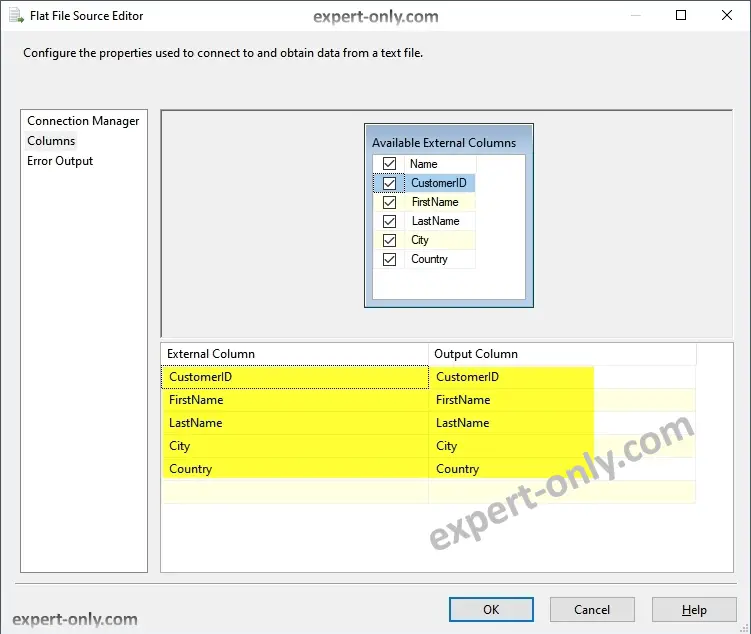
Now click on the Advanced tab. Next, rename the columns if necessary and assign them a consistent data type. By default, SSIS uses the DT_STR type with a length of 50 characters. Use the DT_WSTR type with the correct length to avoid SQL Server conversion errors later in the development of the SSIS package. So adapt the type of each column to the length of the fields in our customer table:
Please note that the names and data types of the columns in the flat file connection must match the names and data types of the columns of the target table in the database, which will make data mapping in SSIS much easier. Now check the columns in the Flat File Source component:
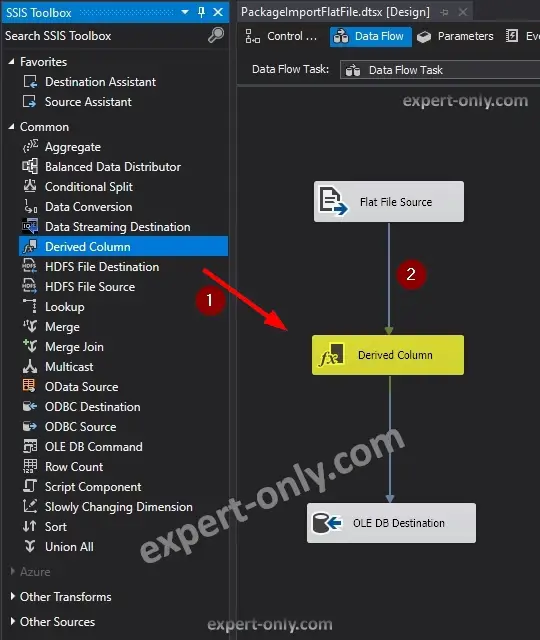
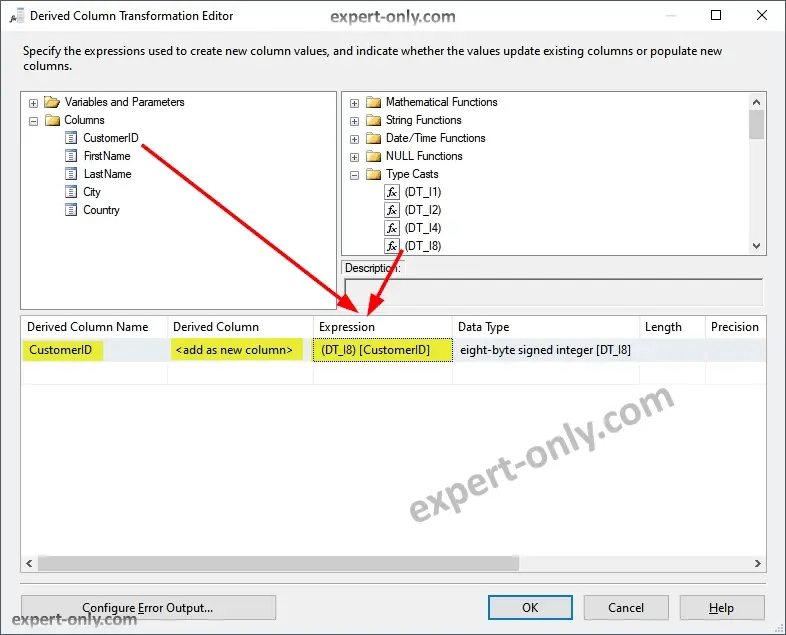
7. Add the Derived Column component and link it to the source
The second part of the text file import into a SQL Server database is the mapping and the connection in SSIS. Indeed, configure now the target database component and load the data with the right format. A format compatible with the data of the flat file.
- In the SSIS toolbox, from the Common part. Drag the Derived Column transformation into the data flow.
- Then link the Flat File Source component to Derived Column as shown in the image below.
Configure the SSIS derived column to change customer ID to integer
The CustomerID column is of type integer, so a new one must be created based on the one in the file. To convert it to a new SSIS column of type Integer (DT_I8).
8. Configure the SSIS OLE DB Destination component
To do this, you must first create a connection to the target database from the SSIS connection manager. Set up the data mapping in the Mappings tab to check that the flat file and SQL Server table columns match. Use the Derived Column.CustomerID column and not the original flat file column.
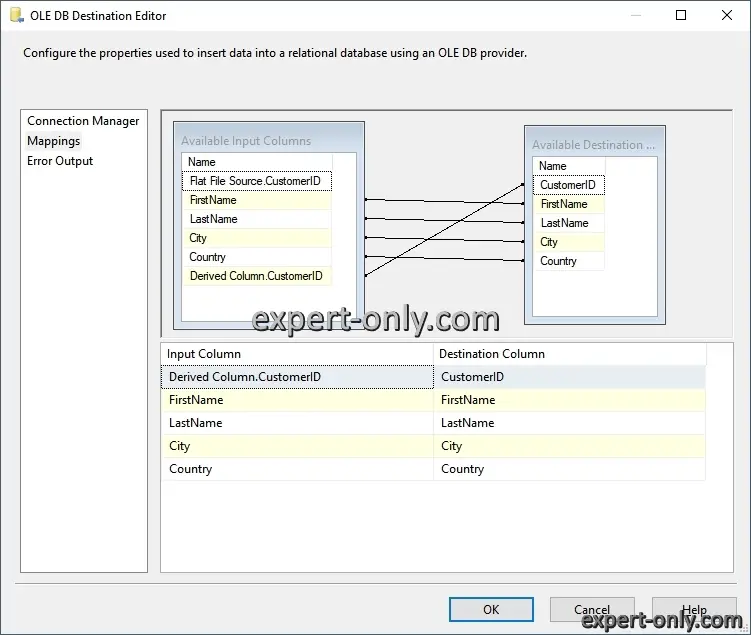
Use the automatic mapping option with SSIS
Note: It is possible to automatically map SSIS columns in the next step. Make sure to name all source and target columns the same.
9. Run the Integration Services package to import CSV data
After configuring the data flow, run the SSIS package and import the CSV file into the SQL Server Customer table. The package processes the 48 initial rows and integrate then into the database.

10. Check CSV data imported in the target table
Of course the last step is a verification, so using SSMS check the data by running these two SQL queries below. The table has 48 rows, identical to the contents of the file. And if you have the same results, then your SSIS package to import CSV file into a SQL Server table is a success.
SELECT COUNT(*) AS [NumberOfCustomers]
FROM   [dbo].[Customers];

SELECT *
FROM   [dbo].[Customers];
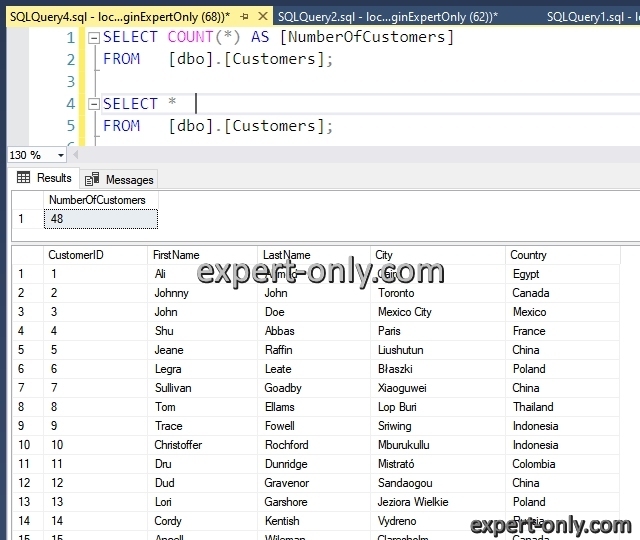
Finally, run a SELECT query to check the data loaded into the database. This example allows you to easily import a text file into a SQL Server database with SSIS. It is also possible to load several flat files into a database with an SSIS loop (For Each File component).
Avoid csv files import errors with SQL Server Integration Services
A common error is the SSIS code 0x80019002 which indicates that the system reaches the maximum number of errors allowed. It is indeed possible to set the number of errors tolerated via the MaximumErrorCount parameter. However, we recommended it only in the case of automatic management of errors and re-loads. Three key elements to check to successfully integrate files and avoid the classic SSIS file integration errors :
- Column separator
- Line separator
- Encoding of the CSV file
So, CSV and flat files integration in general with SSIS and Visual Studio is powerful. However, errors are common, unless you prepare and check the data types in both the source file and the target table beforehand. To take it a step further, it is possible to load an Excel file into a table with SSIS in the same way. The previous tutorial is bout how to create a simple data flow to load a table into another and enrich the data.
About importing CSV data files using Integration Services
To conclude, this step by step SSIS tutorial explains how to import a CSV text file into a SQL Server table with SSIS using a package developed with Visual Studio and without using any script. The data structure, the column names and the proper configuration of all SSIS components are key.


Be the first to comment