How to export a SQL Server table to an Excel file in Python ?
In this tutorial, we will learn how to export a SQL Server table to an Excel file in Python. We will go through two main steps: creating a sample table in SQL Server, using SSMS or directl in Python, preparing an empty Excel file with formatting, and exporting the content of the table to the file in Excel. We will be using the openpyxl and pyodbc libraries in Python for this task. By the end of this tutorial, you will have a clear understanding of how to export data from a SQL Server database to an Excel file using Python.
1. Create a sample SQL Server table
To demonstrate how to export a SQL Server table to an Excel file in Python, we first need a sample table in our SQL Server database.
For this, we can use the following SQL script to create a simple table named employees with four columns:
- id
- name
- department
- salary
1.1 Code to create the sample table using SSMS
CREATE TABLE employees (
   id INT PRIMARY KEY,
   name VARCHAR(50),
   department VARCHAR(50),
   salary INT
);

INSERT INTO employees VALUES (1, 'John Smith', 'Sales', 50000);
INSERT INTO employees VALUES (2, 'Jane Doe', 'Marketing', 60000);
INSERT INTO employees VALUES (3, 'Bob Johnson', 'IT', 70000);
INSERT INTO employees VALUES (4, 'Alice Wong', 'HR', 55000);
1.2 Code to create the table directly with Python
Of course it is also possible to create the table directly from Python. To do so, you can use the pyodbc library in Python to connect to your SQL Server database and execute SQL queries. Here’s an example code that creates the “employees” table and inserts the four rows directly from Python code:
import pyodbc

# connect to the SQL Server database
connection = pyodbc.connect('Driver={SQL Server};'
                            'Server=localhost;'
                            'Database=Expert-Only;'
                            'Trusted_Connection=yes;')

# create the employees table
cursor = connection.cursor()
cursor.execute("""
    CREATE TABLE employees (
        id INT PRIMARY KEY,
        name VARCHAR(50),
        department VARCHAR(50),
        salary INT
    )
""")

# insert the rows into the employees table
cursor.execute("INSERT INTO employees VALUES (1, 'John Smith', 'Sales', 50000)")
cursor.execute("INSERT INTO employees VALUES (2, 'Jane Doe', 'Marketing', 60000)")
cursor.execute("INSERT INTO employees VALUES (3, 'Bob Johnson', 'IT', 70000)")
cursor.execute("INSERT INTO employees VALUES (4, 'Alice Wong', 'HR', 55000)")

# commit the changes and close the connection
connection.commit()
connection.close()
To learn more on how to manage SQL Server tables in Python, read this tutorial.
2. Prepare the Excel file format and export the SQL Server table
Before we can export our SQL Server table to an Excel file in Python, we need to prepare an empty Excel file and format it according to our needs. For this, we can use the openpyxl library in Python. The example code that follows creates a new Excel file and formats its header row.
With our SQL Server table and Excel file ready, we can now export the content of the former to the latter. For this, we can use the pyodbc library to connect to our SQL Server database and retrieve the data, and then the openpyxl library again to populate the rows in the Excel file. Here’s an example code that performs this tasks, i.e. configure the Excel formatting and export data into the file.
import openpyxl
import pyodbc
# create a new workbook and select the active worksheet
workbook = openpyxl.Workbook()
worksheet = workbook.active
# set the column headers and format them
headers = ["ID", "Name", "Department", "Salary"]
for col, header in enumerate(headers, start=1):
cell = worksheet.cell(row=1, column=col)
cell.value = header
cell.font = openpyxl.styles.Font(bold=True)
cell.alignment = openpyxl.styles.Alignment(horizontal="center")
# connect to the SQL Server database
connection = pyodbc.connect('Driver={SQL Server};'
'Server=localhost;'
'Database=Expert-Only;'
'Trusted_Connection=yes;')
# retrieve the data from the employees table
cursor = connection.cursor()
cursor.execute("SELECT id, name, department, salary FROM employees")
data = cursor.fetchall()
# populate the rows in the Excel file
for row, record in enumerate(data, start=2):
for col, value in enumerate(record, start=1):
cell = worksheet.cell(row=row, column=col)
cell.value = value
# save the Excel file
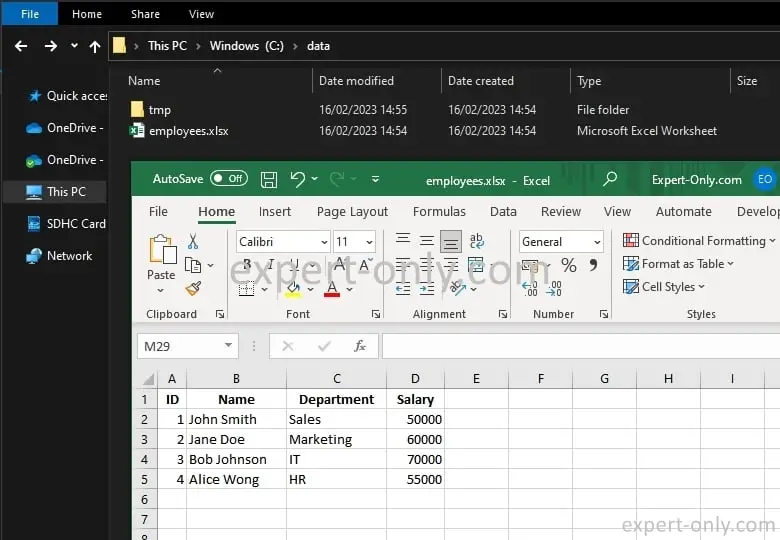
workbook.save("C:\data\employees.xlsx")
In this code, we first connect to our SQL Server database using the “pyodbc” library. And then execute a SQL query to retrieve all the rows from the “employees” table. We then use a nested loop to populate the rows in the Excel file. And finally save the file with the “save” method.
The result is the employees.xlsx Excel file exported to the C:\Data\ folder with the headers in bold and the 4 lines of data as in the source table.
And that’s it! With these three steps, we can export SQL Server data into an MS Excel document in Python.
3. Conclusion on SQL Server table export into Excel in Python
You have successfully learned how to export a SQL Server table to an Excel file in Python. By following the three steps outlined in this tutorial, you can now connect to your MS SQL database. Then retrieve data from a table, and export it to an Excel file with proper formatting using Python. This skill can be useful for a wide range of data analysis and reporting tasks. Continue to explore and practice with these libraries and tools to enhance your Python data manipulation skills.
To go further, this time on file management and compression, this tutorial shows how to zip and unzip files into archives using the zipfile python module.

Be the first to comment