Transform columns in a SQL Server table into rows with the SSIS Unpivot transformation component.
Transforming SQL Server table columns into rows with the SSIS Unpivot transformation component.a To transform columns into rows with the SSIS Unpivot component, it is not necessary to know the T-SQL UNPIVOT operator. Indeed, it is more convenient to write a selection query on data stored vertically rather than horizontally. Here is how to transform columns into rows with the SSIS Unpivot component. To manage the data in a SQL table with flexibility, it is therefore advisable to store the data in rows rather than in column names.
The latter case makes the database structure less manageable. Even though in terms of disk space and performance, on month-to-month data, storing 12 times fewer rows can be useful on SQL projects.
First of all, the purpose of this tutorial is to transform monthly data stored in columns to an inline table. The source table therefore has 12 columns of data, one for each month of the year. The target table has two separate columns, one column for storing the month name and one column for storing the sales amount.
Table of Contents
1. Create the source table with the columns to change to rows using SSIS
Start by creating the dataset to have all the elements in hand and understand this example before adapting it to a more concrete case. The objective is to provide all the material in this tutorial to focus on the Unpivot component and its operation.
From an SSMS connection, execute the following SQL code, which is of type LDD (Data Definition Language). This creates the table dbo.Sales_Monthly_In_Columns with one column of data per month and one row per year.
CREATE TABLE [dbo].[Sales_Monthly_In_Columns]
(
  [CustomerID] int NOT NULL,
  [YearID]     nvarchar(20) NOT NULL,
  [January]    numeric(10,2)  NULL,
  [February]   numeric(10,2)  NULL,
  [March]      numeric(10,2)  NULL,
  [April]      numeric(10,2)  NULL,
  [May]        numeric(10,2)  NULL,
  [June]       numeric(10,2)  NULL,
  [July]       numeric(10,2)  NULL,
  [August]     numeric(10,2)  NULL,
  [September]  numeric(10,2)  NULL,
  [October]    numeric(10,2)  NULL,
  [November]   numeric(10,2)  NULL,
  [December]   numeric(10,2)  NULL
  CONSTRAINT [SalesMonthlyColumnsPK]
    PRIMARY KEY CLUSTERED (
      [CustomerID], [YearID] ASC
    )
);
GO
2. Insert monthly sales data stored in columns
Then insert the dataset with sales for the years 2021 and 2022 in the previously created table. The data covers 8 different customers, uniquely identified by the customer number, CustomerID.
INSERT [dbo].[Sales_Monthly_In_Columns] VALUES (1, N'2021', 221.80, 2658.80, 2485.00, 6302.80, 7605.60, 5288.50, 3335.20, 5216.40, 4372.20, 9815.60, 5479.00, 9212.10 );
INSERT [dbo].[Sales_Monthly_In_Columns] VALUES (1, N'2022', 7575.90, 6662.60, 1464.60, 7011.10, 3978.30, 4101.10, 5964.80, 2619.60, 4482.00, 3874.00, 3171.80, 1610.70 );
INSERT [dbo].[Sales_Monthly_In_Columns] VALUES (2, N'2021', 6263.30, 1952.50, 9110.00, 5433.30, 1177.90, 9418.80, 8657.90, 5264.80, 595.80, 6332.50, 3268.50, 3413.50 );
INSERT [dbo].[Sales_Monthly_In_Columns] VALUES (2, N'2022', 2969.90, 3022.70, 1626.10, 9396.30, 8723.30, 9784.80, 9084.10, 3366.40, 8784.50, 1313.50, 7135.00, 8379.10 );
INSERT [dbo].[Sales_Monthly_In_Columns] VALUES (3, N'2021', 2618.90, 5898.70, 7929.10, 5614.40, 7561.80, 5545.80, 2666.50, 2229.70, 1500.50, 6051.40, 1992.20, 1060.80 );
INSERT [dbo].[Sales_Monthly_In_Columns] VALUES (3, N'2022', 2433.10, 8977.80, 9414.60, 4195.10, 6623.20, 1783.40, 1480.30, 4175.00, 2497.20, 6332.10, 6839.20, 145.50 );
INSERT [dbo].[Sales_Monthly_In_Columns] VALUES (4, N'2021', 7170.40, 3507.00, 9154.70, 4465.00, 1109.30, 1905.70, 7980.70, 9227.50, 2166.00, 2988.30, 6353.80, 9448.70 );
INSERT [dbo].[Sales_Monthly_In_Columns] VALUES (4, N'2022', 3287.60, 1805.70, 2068.20, 8353.40, 1378.70, 4689.10, 4720.00, 5643.60, 2722.50, 5539.00, 5494.60, 1790.60 );
INSERT [dbo].[Sales_Monthly_In_Columns] VALUES (5, N'2021', 3336.20, 7451.40, 1656.60, 978.30, 8794.60, 7568.30, 3547.80, 8382.20, 3068.10, 7882.30, 5726.60, 9693.10 );
INSERT [dbo].[Sales_Monthly_In_Columns] VALUES (5, N'2022', 1365.70, 3680.60, 8256.40, 5379.20, 1075.50, 2852.70, 4520.80, 7253.10, 3285.60, 705.10, 2134.60, 7437.00 );
INSERT [dbo].[Sales_Monthly_In_Columns] VALUES (6, N'2021', 1421.30, 2552.40, 174.20, 9158.00, 8138.50, 8458.30, 6548.90, 4805.80, 3026.50, 8127.40, 6626.40, 1035.70 );
INSERT [dbo].[Sales_Monthly_In_Columns] VALUES (6, N'2022', 2253.40, 1107.30, 9349.30, 3751.80, 9320.90, 2485.60, 435.30, 6358.10, 733.10, 1015.90, 7780.70, 6232.40 );
INSERT [dbo].[Sales_Monthly_In_Columns] VALUES (7, N'2021', 3971.30, 1538.20, 7727.50, 4494.10, 6314.70, 640.10, 6070.30, 5926.00, 7013.10, 2119.20, 3188.20, 4474.20 );
INSERT [dbo].[Sales_Monthly_In_Columns] VALUES (7, N'2022', 7082.40, 3010.10, 8716.00, 8493.50, 1782.80, 3023.20, 3897.60, 1752.80, 5952.30, 8430.40, 6643.10, 6276.10 );
INSERT [dbo].[Sales_Monthly_In_Columns] VALUES (8, N'2021', 7279.40, 4494.40, 7045.30, 4253.30, 6702.40, 9017.20, 810.00, 7891.80, 663.10, 5771.40, 3190.10, 6130.00 );
INSERT [dbo].[Sales_Monthly_In_Columns] VALUES (8, N'2022', 8253.70, 7844.60, 3655.80, 1046.10, 290.10, 5580.40, 3572.70, 9926.10, 6213.90, 7622.80, 3414.60, 4581.40 );
3. Create the target table to store data in rows
Now create the second SQL table, this time with the months in rows. The grouping columns, i.e. customer number and year are still present.
CREATE TABLE [dbo].[Sales_Monthly_In_Lines]
(
  [CustomerID]  int NOT NULL,
  [YearID]      nvarchar(20) NOT NULL,
  [MonthName]   nvarchar(10) NOT NULL,
  [SalesAmount] numeric(10,2)  NULL
  CONSTRAINT [SalesMonthlyLinesPK]
    PRIMARY KEY CLUSTERED (
      [CustomerID], [YearID], [MonthName] ASC
    )
);
GO
4. Add the SSIS OLE DB and UNPIVOT components
Here are a few key steps in this course for changing columns into rows with SSIS and the Unpivot transformation. That is, the configuration of the data flow. To do so, follow these prerequisite steps:
- Open an existing SSIS package or create a new project and package with Visual Studio.
- Create a connection to the SQL Server database, which is required to run the package.
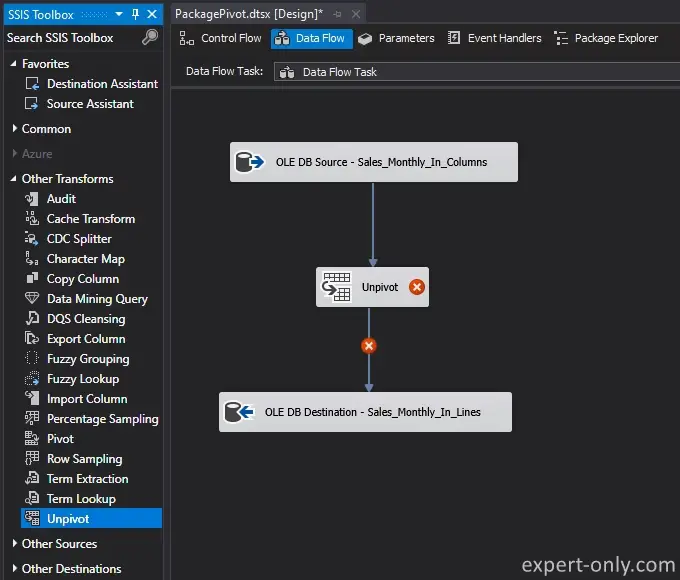
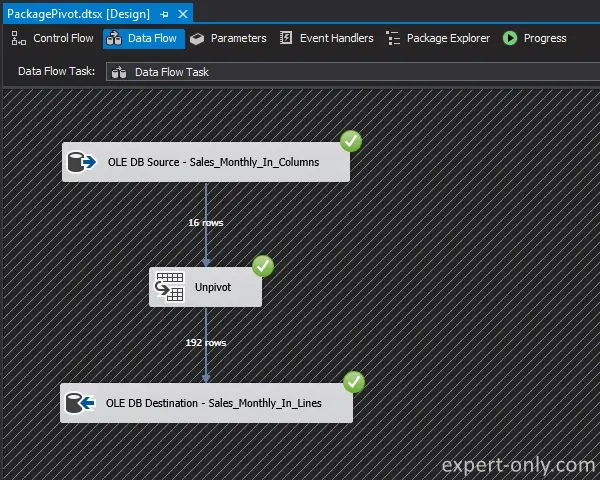
- Then add a data flow and insert the three useful components listed below.
3 components to add in the SSIS dataflow:
- OLE DB Source : à faire pointer sur la table Sales_Monthly_In_Columns
- Composant SSIS Unpivot : à paramétrer pour transposer les mois et leur valeur en lignes
- OLE DB Destination : pointer sur la table cible Sales_Monthly_In_Lines avec la structure en lignes.
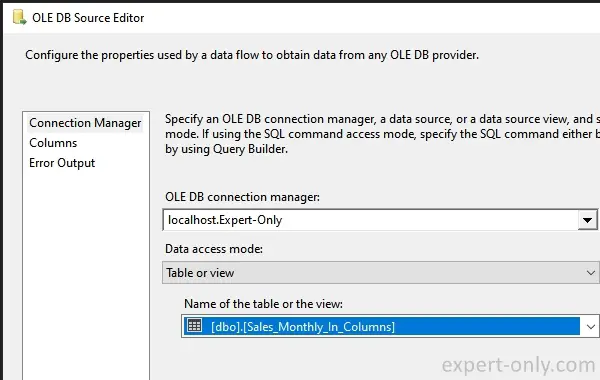
5. Configure the source table and column mappings
Simply select the source table created in the first step with the column structure as the source for the SSIS package.
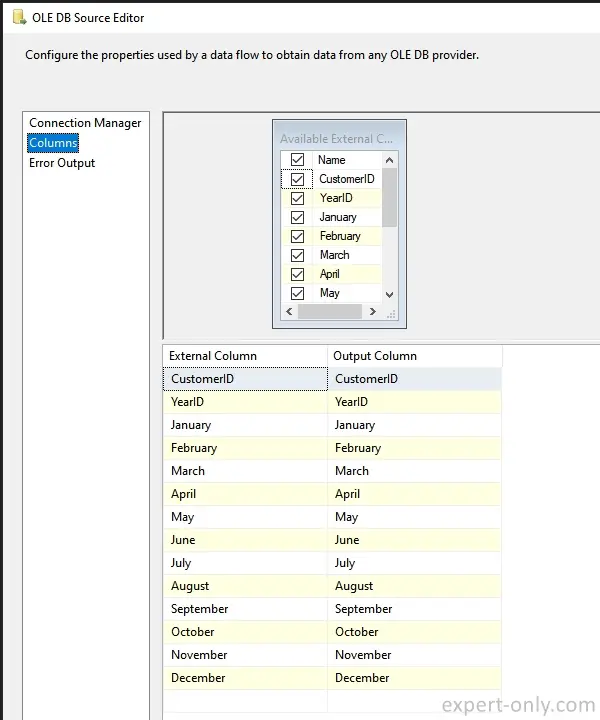
Also check the columns present from the Columns tab, all 12 months are present as in the screenshot below.
6. Configure the SSIS Unpivot transformation
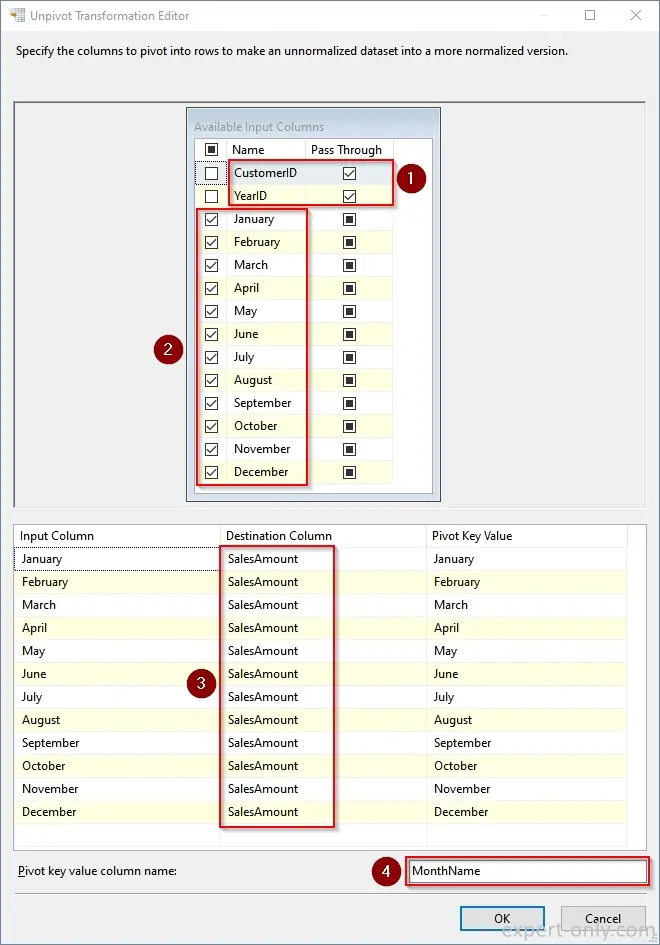
Perform these 4 steps to configure the SSIS Unpivot component and change data from columns to rows. Each step number is inked to the screenshot below:
- Select the aggregation columns with the Pass Through option: here it is CustomerID and YearID.
- Select all the columns to be transposed: the columns of the 12 months from January to December.
- Enter the name of the new column where to store the sales: SalesAmount.
- Type the name of the column for the pivot key, or store the name of the months: MonthName.
7. Manage the truncation warning displayed by SSIS
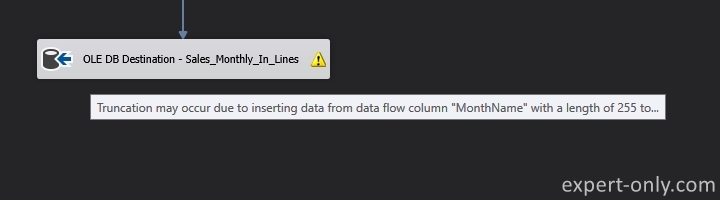
As in many source components or data transformation components, SQL Server Integration Services assigns a default data type to the new columns which is (DT_WSTR,255). This causes this warning in the target component.
[OLE DB Destination] Warning: Truncation may occur due to inserting data from data flow column “MonthName” with a length of 255 to database column “MonthName” with a length of 10.
The warning is displayed because the new MonthName column output from the Unpivot block is of type DT_WSTR with a length of 255, while the column in the table is of type NVARCHAR(10).
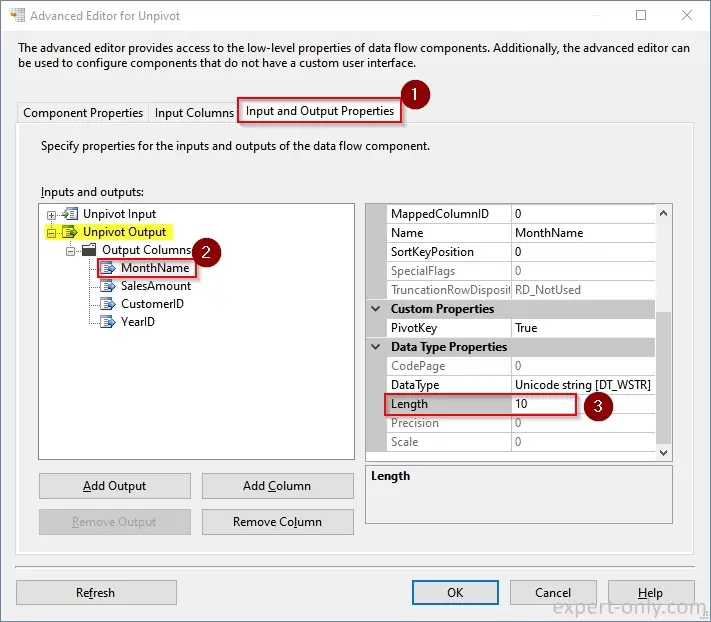
The solution to manage this behaviour and remove the warning is to change the type of the output column in the advanced editor of the Unpivot SSIS block.
- First right-click on the Unpivot SSIS component and choose Show Advanced Editor… in the contextual menu. Then select the Input and Output Properties tab.
- From the Unpivot Output section, select the MonthName column to edit.
- Finally change the length from 255 characters to 10 characters.
After this adaptation of the length to the target column type, the package can be executed smoothly and without warnings in the SSIS logs at each execution.
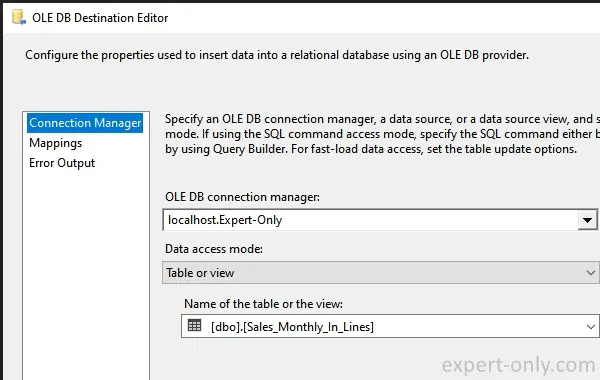
8. Set up the target table with the row structure
Now open the destination and choose the second table with a row data structure.
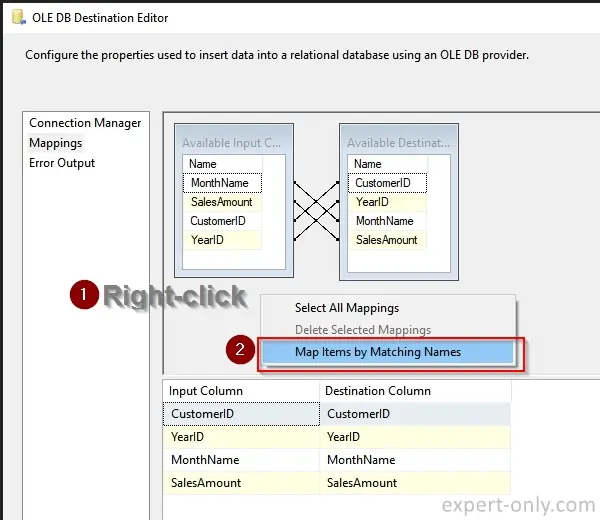
Double check the mapping, and if necessary map the columns based on the column names. Note that we intentionally name the column the same way to make the mapping much easier and automated.
- Open the OLE DB editor and right-click
- Then select Map Items by Matching Names
9. Run the SSIS package and transform columns to rows
Finally, run the package to rotate the 16 source lines into 16*12 lines, making a total of 192 lines.
10. Compare source columns with the target row using SSMS
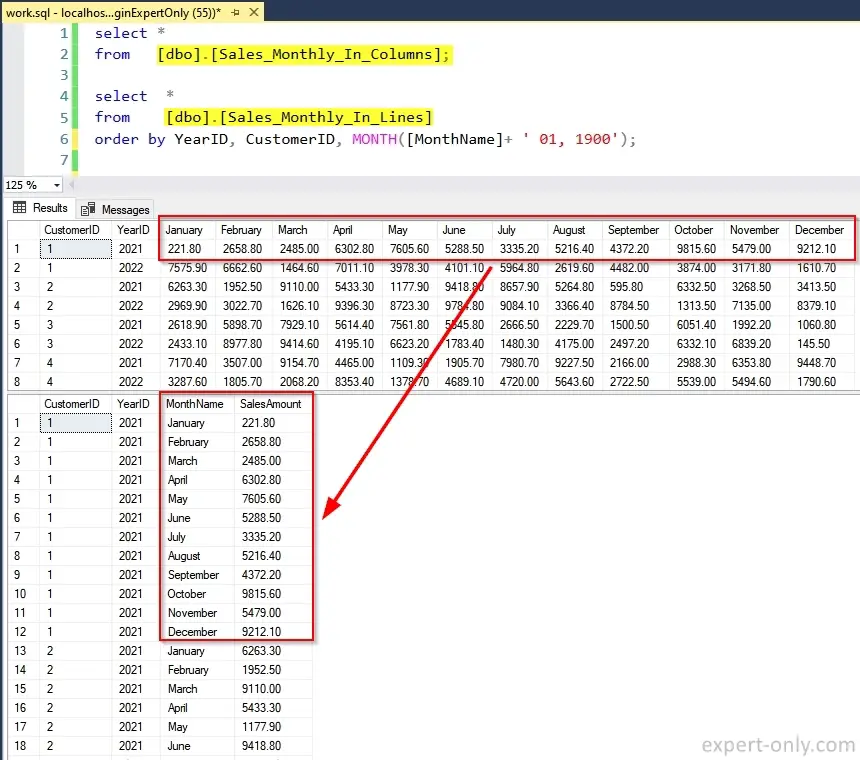
To check that the SSIS package is working properly, first connect to SSMS and run these two SQL queries.
- Une première requête SQL pour lire la table source en colonnes.
- Une deuxième requête SQL pour lire la table transformée en lignes.
- A first SQL query to read the source table in columns.
- A second SQL query to read the target table in rows, after the SSIS Unpivot execution.
select * from [dbo].[Sales_Monthly_In_Columns];

select	*
from	[dbo].[Sales_Monthly_In_Lines]
order by YearID, CustomerID, MONTH(MonthName + ' 01, 1900');
Finally, the month amounts of the first table are present in the second table with data stored in a row structure.
Conclusion on the SSIS Unpivot transformation
Transforming columns into rows with SSIS and the UNPIVOT transformation is therefore simple and guided, almost automatic. You just have to manage the length of the columns of the PIVOT keys. A prerequisite is to understand how the classic UNPIVOT operator works in T-SQL.


Be the first to comment