How to create a simple data flow with SSIS and Visual Studio 2019?
This tutorial explains how to create a basic SSIS data flow and serves as an example to get started with a first data manipulation. That is to say to configure a package to extract, transform if necessary and finally load the data in another MS database or another SQL table. A data flow allows for example to copy data from a local MS SQL database to a flat file or vice versa. Or more generally from a data source to a target.
Create a basic SSIS data flow to transfer data between two tables
SSIS is the ETL brick of the SQL Server BI suite, i.e. Microsoft SSIS packages are used to integrate and process data. In an SSIS package, the basic elements are control flows and data flows. In addition, data integration software suites are at the heart of data warehouse development projects.
An SSIS package is structured as follows:
- SSIS package (Package.dtsx for example)
- Control Flow
- Data Flow
- Control Flow
This means that an SSIS package contains one or more control flows, and the control flows themselves contain one or more data flows.
Prerequisite for the tutorial is to install Visual Studio 2019 and SSIS projects
Before starting this tutorial:
- Start by installing Visual Studio 2019 and the SSIS projects extension.
- Then create an SSIS project.
- Create a connection to the SQL Server database with SSIS, using the Connection Managers.
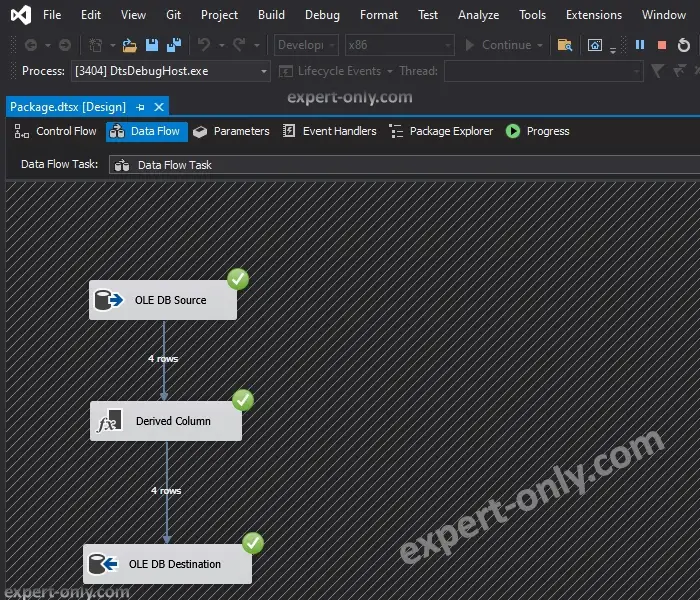
1. Add the data stream to the control flow and create the source table
To begin, from the Visual Studio 2019 window, drag the Data Flow Task component onto the workspace in the Control Flow tab. Or double-click on the component from the SSIS Toolbox. Then double-click it to edit it.

This tutorial uses this table, created in this tutorial on creating MS SQL tables with a primary key. The code for creating the source table is available below. To create the table and insert the data, connect to the database with SSMS.
-- Create the customers source table
CREATE TABLE [dbo].[Customers](
   [CustomerID] [int] NOT NULL,
   [FirstName] [nvarchar](20) NULL,
   [LastName] [nvarchar](20) NULL,
   [City] [nvarchar](20) NULL,
   [Country] [nvarchar](50) NULL,
   CONSTRAINT [CustomersPrimaryKeyCustomerID] PRIMARY KEY CLUSTERED ([CustomerID] ASC)
);
GO
-- Insert 4 different lines
INSERT INTO dbo.Customers (CustomerID, FirstName, LastName, City, Country)
VALUES ( 1, 'Ali','Ahmed','Cairo','Egypt');
INSERT INTO dbo.Customers (CustomerID, FirstName, LastName, City, Country)
VALUES ( 2, 'Johnny','John','Toronto','Canada');
INSERT INTO dbo.Customers (CustomerID, FirstName, LastName, City, Country)
VALUES ( 3, 'John','Doe','Mexico City','Mexico');
INSERT INTO dbo.Customers (CustomerID, FirstName, LastName, City, Country)
VALUES ( 4, 'Shu','Abbas','Paris','France');
2. Configure the OLE DB data source
The cursor is now on the Data Flow tab. From this tab, select the OLE DB Source tool and drag it onto the workspace.
Double click on the component. From the OLE DB Source editor menu, select the Connection Manager tab. Then select the database and source table for our data stream.
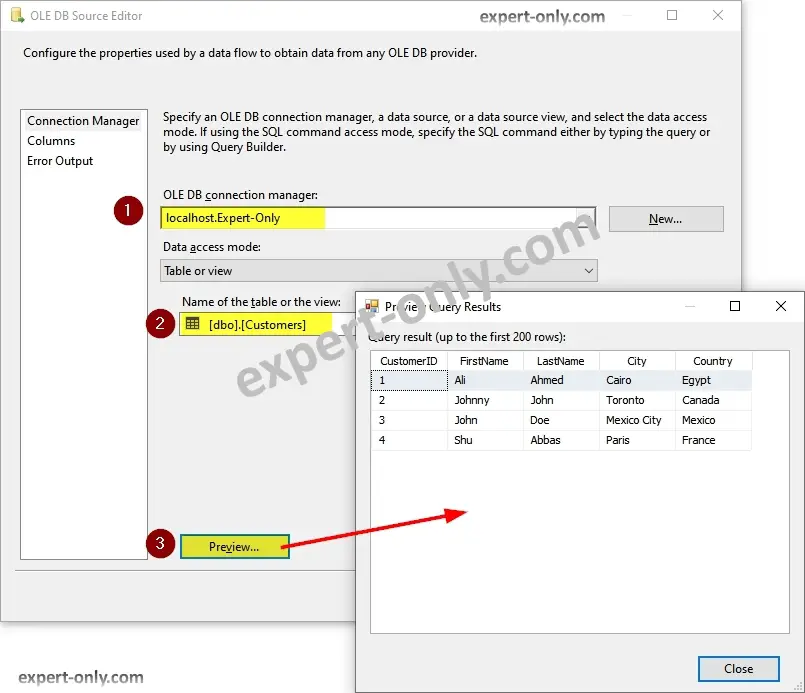
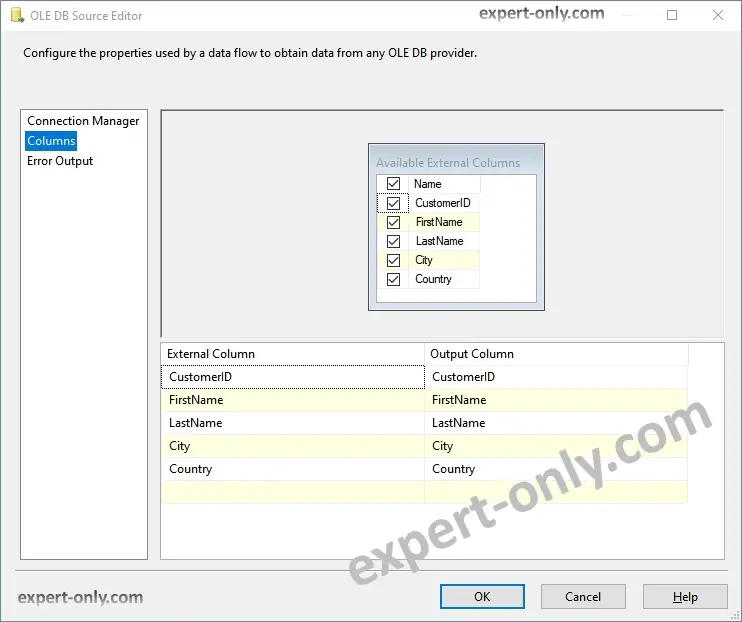
Then go to the Columns tab and check that the columns of the table are present. Finally select those whose content is to be exported. Perform the mapping according to the column names. By default, the output columns have the same name as the columns in the source table.
3. Create a derived SSIS column
Create a transformation with the SSIS Derived Column component. Add it to the data stream, link it to the OLE DB Source tool and double click to open the component.

Editing the data is done in the Derived Column Transformation Editor menu. Insert a column or make changes using the various SSIS functions from the right-hand window.
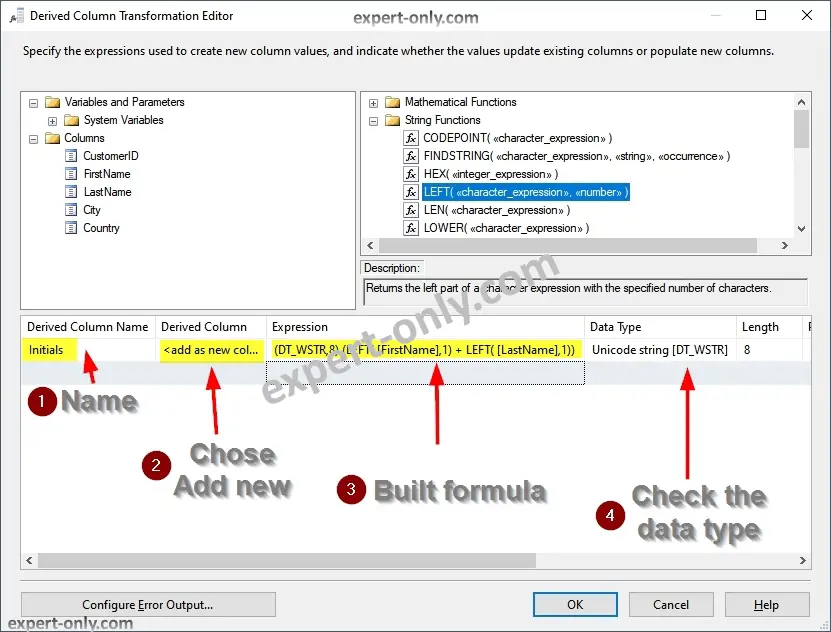
Here the aim is to transform the surname and first name into a target column with the initials of each customer. Follow the steps below:
- Create a new column called Initials.
- Choose add as a new column so as not to replace an existing column.
- Then fill in the formula
- Here the choice is to add a new column, with a length of 8 characters.
The formula used in the package retrieves the first letter of the first name, then concatenates the result with the first letter of the last name and finally forces the type with a length of 8 characters.
(DT_WSTR,8)(LEFT(FirstName,1) + LEFT(LastName,1))
The equivalent of the SQL Server NVARCHAR data type is the SSIS DT_WSTR type.
4. Add the OLE DB destination to the data flow and create the target table
To store the modified data, start by creating the target table with the following SQL code. This is the same table structure with an extra column to hold the initials.
CREATE TABLE [dbo].[Customers_with_initials](
   [CustomerID] [int] NOT NULL,
   [FirstName] [nvarchar](20) NULL,
   [LastName] [nvarchar](20) NULL,
   [City] [nvarchar](20) NULL,
   [Country] [nvarchar](50) NULL,
   [Initials] [nvarchar](8) NULL,
   CONSTRAINT [CustomersInitialsPKCustomerID] PRIMARY KEY CLUSTERED ([CustomerID] ASC)
);
GO
Then select the OLE DB Destination component and drag it onto the workspace in the data stream. Then link the Derived Column tool to it. Finally, double click on it to edit it.

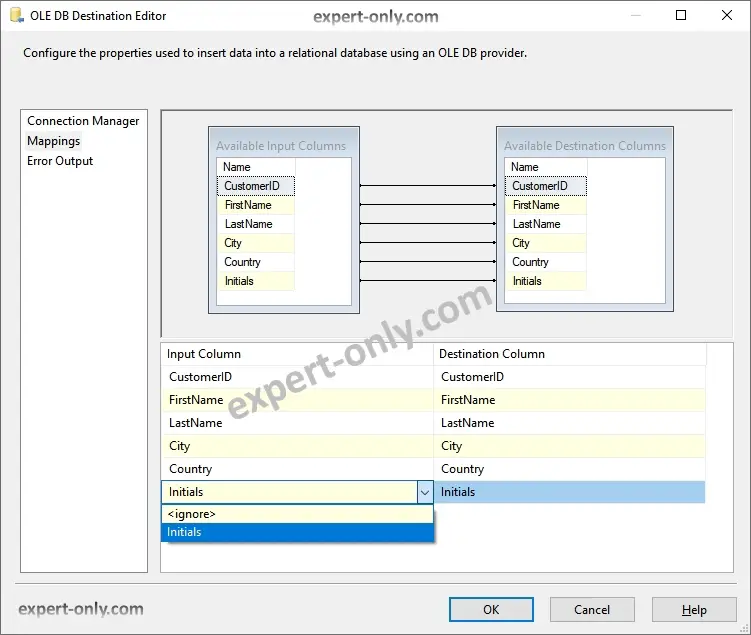
Open the OLE DB Destination Editor menu. In the connection manager tab, choose the destination table for the load.
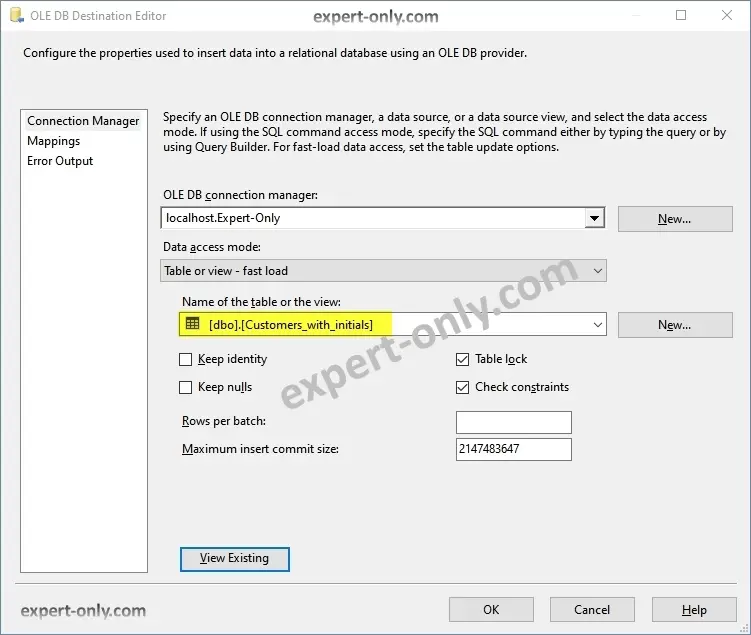
Then in the Mappings tab, check that the columns are linked correctly. By default, the Integration Services package editor automatically links columns with the same name.
It is good SSIS practice to rename columns upstream to facilitate data mapping.
5. Run the SSIS package and check the results with SSMS
Now, to start loading, you need to run the package from Visual Studio. To do this, click on the Start button or directly with the F5 shortcut.
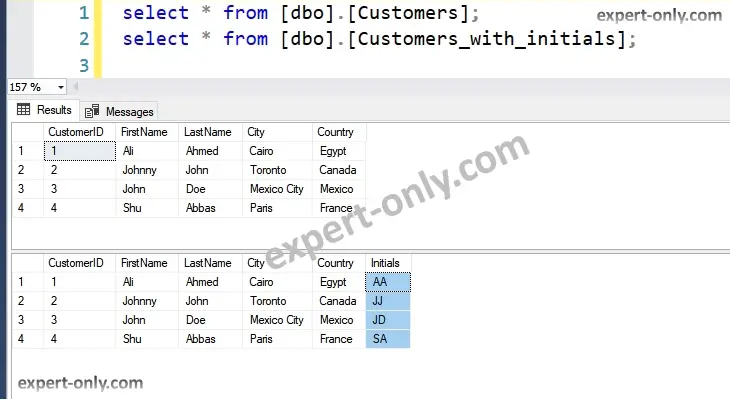
To check the data in both tables, simply run these selection queries from SSMS:
select * from [dbo].[Customers];
select * from [dbo].[Customers_with_initials];
Video tutorial to create a simple data flow with SSIS
The video tutorial shows all the steps to load data from a source table to a target one and how to populate the Initials additional column with data from the existing columns.
So here is how to create a basic SSIS data flow to copy data from one table to another and add a column derived from two existing columns. To take data manipulation with SSIS a step further, here’s how to detect and manage data types from an Excel source file.


Be the first to comment