Step by step video and blog post tutorial to create a new SSIS project and a solution with Visual Studio.
To develop SSIS packages, i.e., SQL Server Integration Services objects, you need an integrated development environment, also called IDE. Visual Studio is the development environment provided by Microsoft. To create a new solution, a new project and a new SSIS package with VS2019, you need first to install Visual Studio 2019 and then install the Integration Services project extension. How do I create an SSIS solution and SSIS project? With Visual Studio Integration Services, creating a solution is like creating a container that groups your SSIS projects. An SSIS project groups together all the SSIS packages in the same project.
First, creating SSIS solutions and projects with Visual Studio allows you to group and organise the packages under development. But also, the connections by themes or functional areas. To create an SSIS project, follow these steps.
Video tutorial to Create an SSIS project and solution with Visual Studio
The illustrated tutorial with video steps to create an SSIS project and add a package.
step 1. Open Visual Studio 2019
Click on the Start Windows button, search the programs or use the search bar and type Visual Studio 2019.

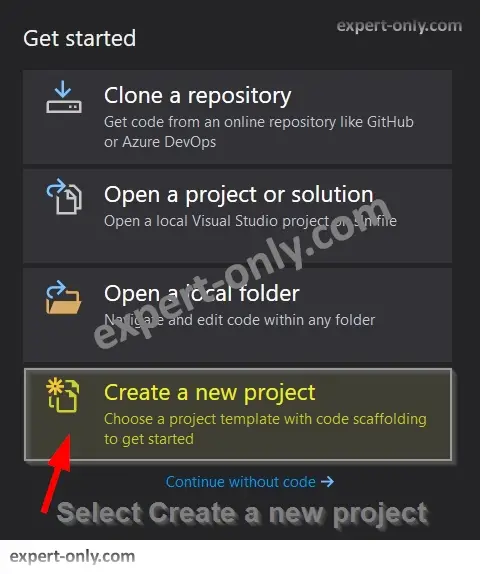
step 2. Select the Create a new project option
In the start-up screen, select Create a new project. Then validate. The type of project is chosen in the next step.
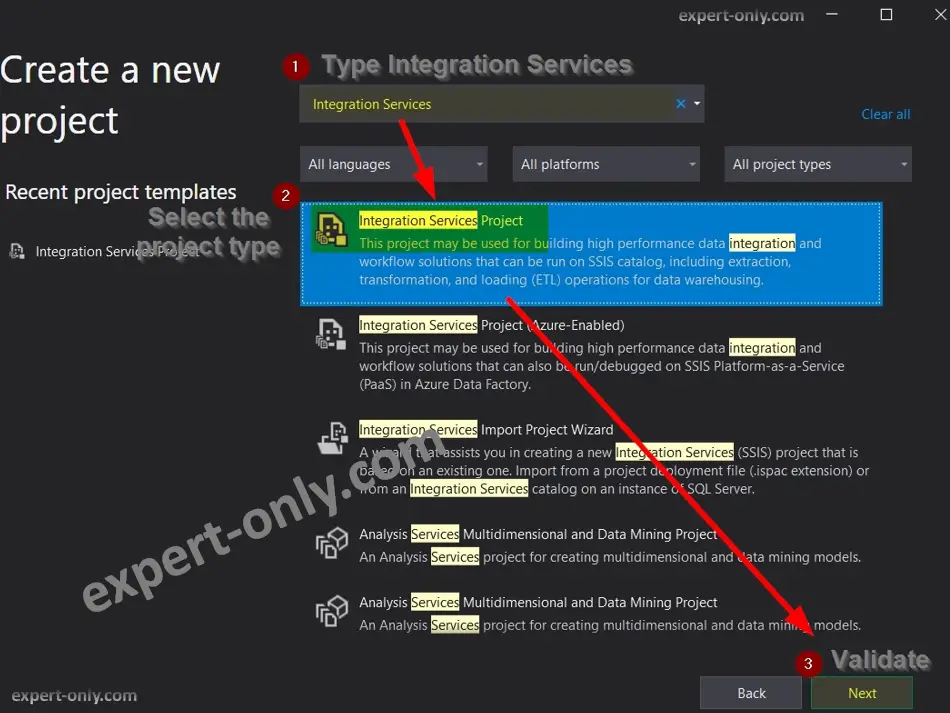
step 3. Select the Integration Services Project template
In the search bar, type Integration Services, then select the corresponding type from the list. If the project type does not appear, then check the installation of SSS projects in Visual Studio. Finally, validate to proceed to the next step of creating the SSIS project. To summarise:
- Type Integration Services Project in the search bar
- Select the Integration Services Project type
- Click on Next to validate.
step 4. Configure the location of the SSIS project and solution
An SSIS project, or a Visual Studio project, is usually stored in a solution, a solution can contain several projects of different types. For example, a complete BI solution with a T-SQL project, an SSIS ETL project and a Tabular Model project.
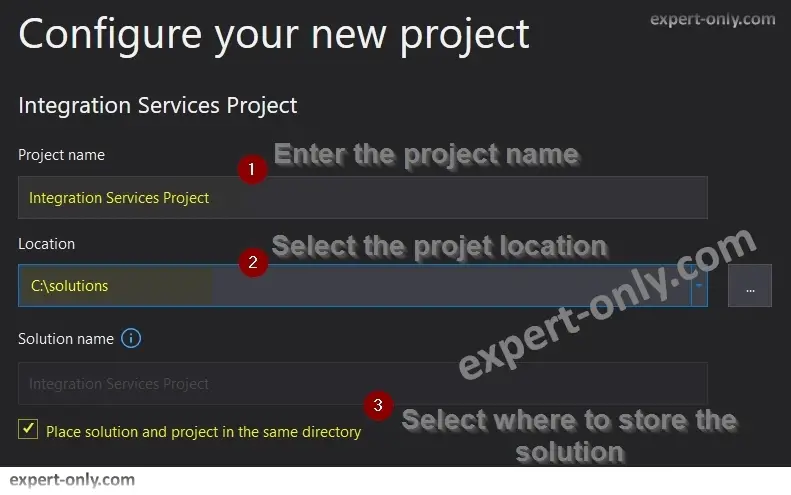
In the example below, the box is checked, and the file is therefore in the same folder. In this case the solution has the same name as the SSIS project. To use the same configuration, follow these three steps below as in the next screenshot:
- Enter the SSIS project name, here it is, per default: Integration Services Project
- Type or browse to the location, here : C:\solutions
- Then leave the option to place the solution and project in the same directory ticked.
When creating a dedicated solution, project or SSIS package, it is advisable to rename them to avoid confusion. That is, do not leave the default names proposed by Visual Studio.
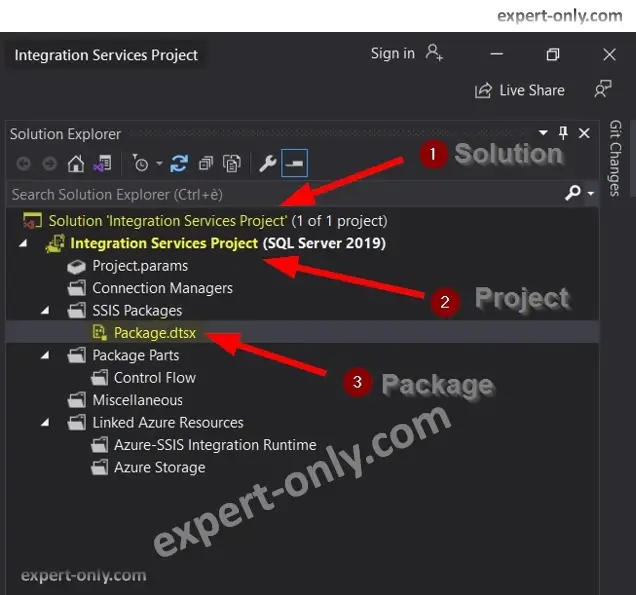
step 5. The Solution Explorer shows the project structure that stores the package
When the project is opened, the main navigation window is called Solution Explorer. To open it manually, go to the View menu and select Solution Explorer or use the shortcut CTRL+ALT+L.
SSIS solution and project files generated by Visual Studio
When the SSIS solution is created, a folder is created at the chosen location containing the solution and project. These include a .sln file and a .suo file. The SLN file is the solution file and the SUO file contains the user’s preferences and settings.
In the SSIS project folder, here it is C:\solutions\Integration Services Project, you will find the following SSIS project files:
- The first one is :Integration Services Project.database
- Integration Services Project.dtproj
- Integration Services Project.dtproj.user
- Last but least, Package.dtsx : the first SSIS package created automatically with a default name
From the Solution Explorer window, there is no need to create the first package manually. The system creates it automatically and gives it a default name: package.dtsx. It is strongly advised to rename it to avoid confusion.
step 6. Add a new SSIS project to an existing solution in Visual Studio
It is also possible to add a new SSIS project to your solution, there are three possible solutions:
- Right-click on the SSIS project, click on Add and then on New Item
- Right-click on the SSIS Packages folder, then choose New SSIS Package
- To duplicate a package directly, select the package and do a CTRL+C then CTRL+V
step 7. Add a new SSIS package to an existing project
Finally, to create a new SSIS package in the SSIS project, right-click on an existing SSIS package and choose New SSIS Package.
Conclusion on creating SSIS projects and solutions using Visual Studio
To conclude, this tutorial provides all the simple steps to set up an SSIS project and solution in Visual Studio 2019. It shows how to select the correct project template, configure the project storage, and check the Solution Explorer, and add projects or packages. By following these steps, users can quickly begin to develop their SSIS packages.
Finally, you can now create your first SSIS control and data flow to load data from a table to another one.


Be the first to comment