Step by step video tutorial to develop an Integration Services package and export data from a SQL Server table into an Excel file.
This video tutorial explains how to export a SQL Server data from a table to an Excel file with an SSIS package. To manage the contents of this table within an Excel file, begin by creating an SSIS solution, project, and package. Then, follow the step-by-step instructions below to export the table rows to the Excel file.
Table of Contents
Full Video tutorial to export data from SQL Server to an Excel File
1. Check or install the Excel 2010 or 2016 drivers
First, download and install the OLEDB Access Database Engine 2016 driver for Excel. This configuration works with Excel and the Office 365 pack installed in 64-bit and Visual Studio 2019. These 2 steps, in this order worked for me.
- Install the 64-bit Excel 2016 driver first.
- Then install the 32-bit Excel 2010 driver.
2. Create the table to export from SQL Server to Excel
From an SSMS Window, create the customer table using the code from this tutorial on exporting a table to a CSV file.
-- Create the customer table
CREATE TABLE [dbo].[Customers](
   [CustomerID] [int] NOT NULL,
   [FirstName] [nvarchar](20) NULL,
   [LastName] [nvarchar](20) NULL,
   [City] [nvarchar](20) NULL,
   [Country] [nvarchar](50) NULL,
   CONSTRAINT [CustomersPrimaryKeyCustomerID] PRIMARY KEY CLUSTERED ([CustomerID] ASC)
);
GO

-- Insert 24 rows with customer data
INSERT INTO [dbo].[Customers] VALUES (1, N'Ali', N'Ahmed', N'Cairo', N'Egypt');
INSERT INTO [dbo].[Customers] VALUES (2, N'Johnny', N'John', N'Toronto', N'Canada');
INSERT INTO [dbo].[Customers] VALUES (3, N'John', N'Doe', N'Mexico City', N'Mexico');
INSERT INTO [dbo].[Customers] VALUES (4, N'Shu', N'Abbas', N'Paris', N'France');
INSERT INTO [dbo].[Customers] VALUES (5, N'Jeane', N'Raffin', N'Liushutun', N'China');
INSERT INTO [dbo].[Customers] VALUES (6, N'Legra', N'Leate', N'Błaszki', N'Poland');
INSERT INTO [dbo].[Customers] VALUES (7, N'Sullivan', N'Goadby', N'Xiaoguwei', N'China');
INSERT INTO [dbo].[Customers] VALUES (8, N'Tom', N'Ellams', N'Lop Buri', N'Thailand');
INSERT INTO [dbo].[Customers] VALUES (9, N'Trace', N'Fowell', N'Sriwing', N'Indonesia');
INSERT INTO [dbo].[Customers] VALUES (10, N'Christoffer', N'Rochford', N'Mburukullu', N'Indonesia');
INSERT INTO [dbo].[Customers] VALUES (11, N'Dru', N'Dunridge', N'Mistrató', N'Colombia');
INSERT INTO [dbo].[Customers] VALUES (12, N'Dud', N'Gravenor', N'Sandaogou', N'China');
INSERT INTO [dbo].[Customers] VALUES (13, N'Lori', N'Garshore', N'Jeziora Wielkie', N'Poland');
INSERT INTO [dbo].[Customers] VALUES (14, N'Cordy', N'Kentish', N'Vydreno', N'Russia');
INSERT INTO [dbo].[Customers] VALUES (15, N'Ancell', N'Wileman', N'Claresholm', N'Canada');
INSERT INTO [dbo].[Customers] VALUES (16, N'Elsworth', N'Chantrell', N'Sumberjo', N'Indonesia');
INSERT INTO [dbo].[Customers] VALUES (17, N'Beverly', N'Giraudy', N'Cigembong', N'Indonesia');
INSERT INTO [dbo].[Customers] VALUES (18, N'Tamas', N'Zavattiero', N'Jangkat', N'Indonesia');
INSERT INTO [dbo].[Customers] VALUES (19, N'Benedick', N'Schaffler', N'Itaparica', N'Brazil');
INSERT INTO [dbo].[Customers] VALUES (20, N'Leonard', N'Brimman', N'Moscow', N'Russia');
INSERT INTO [dbo].[Customers] VALUES (21, N'Morton', N'Capelle', N'Uk', N'Russia');
INSERT INTO [dbo].[Customers] VALUES (22, N'Larissa', N'Rawle', N'Tembayangan Barat', N'Indonesia');
INSERT INTO [dbo].[Customers] VALUES (23, N'Karalee', N'Wall', N'Clifden', N'Ireland');
INSERT INTO [dbo].[Customers] VALUES (24, N'Miller', N'Shakesbye', N'Gongnong', N'China');
After inserting the 24 rows into the customer table to export, this sample dataset will be used to execute the package and obtain a real-life result in the Excel file. Of course, your data and environment might vary, but the principles are the same.

To simplify data mapping, prepare an Excel file in XLSX format and add column names beforehand. In this case, the column names are as follows:
- CustomerID
- FirstName
- LastName
- City
- Country
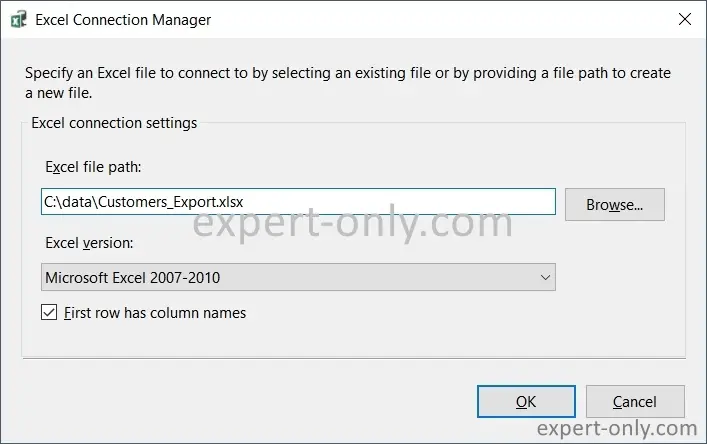
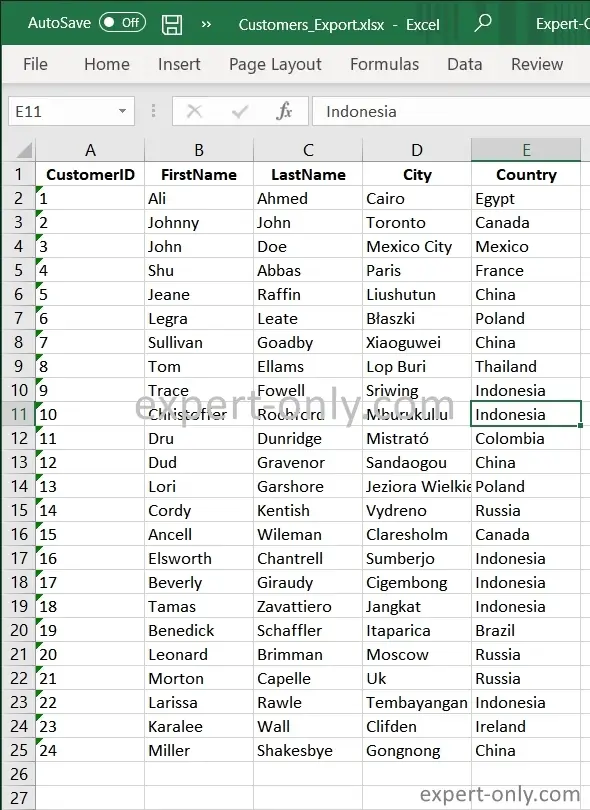
Prepare the header row of the target Excel file to map the columns from SSIS. The file used here is stored at: C:\data\Customers_Export.xlsx
3. Create an SSIS data flow from the table to Excel
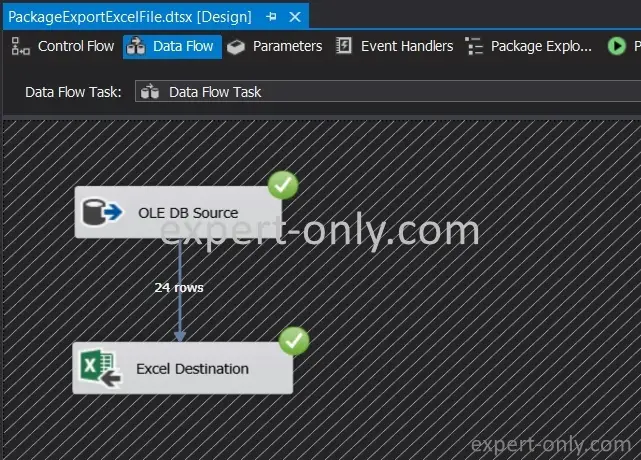
From the Data Flow tab, add the OLE DB Source and Excel Destination components to the workspace. Then, double-click the first component to configure it.

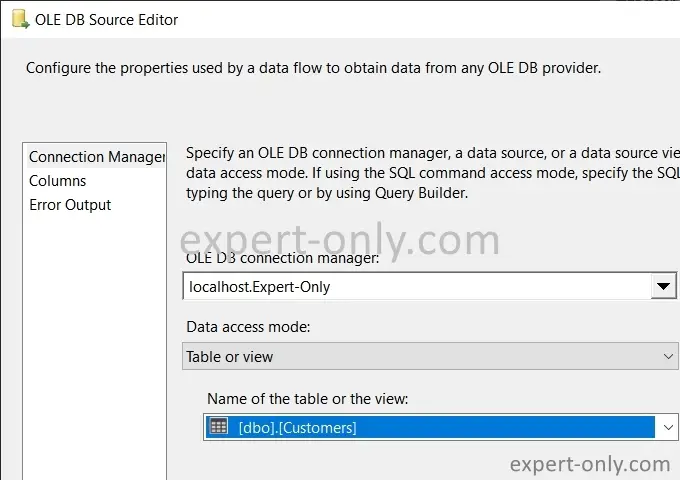
Once in the OLE DB Source Editor options window, select the database connection and the customer table to export to the Excel file. Finally, confirm to close the window.
The following steps will help you configure the link to the exported Excel file.
4. Set up an SSIS connection to the Excel file
After configuring the OLE DB Source component, use the empty Excel file with headers to receive the data. To export data to the Excel file, connect the OLE DB Source component to the Excel Destination component using the green arrow. Then, create an Excel connection as follows, from the SSIS connection manager.
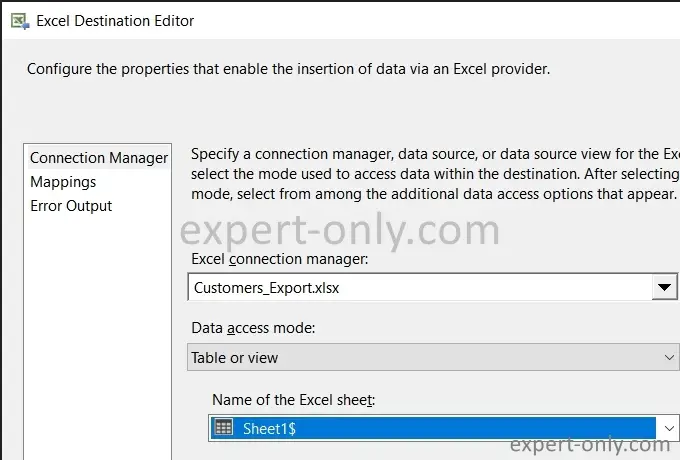
Next, double-click the Excel component. In the Excel Destination Editor, choose the Excel file connection created earlier. Also, select which tab to export the data to; in this case, it is the default English tab, Sheet1$.
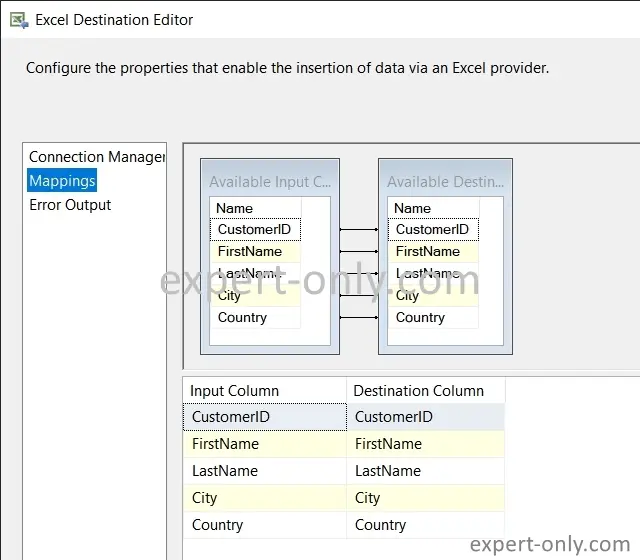
Click on Mappings, and if necessary, manually match the columns by clicking on Ignore and then choosing the appropriate column. Confirm to close the window.
5. Execute package to export data from the table to the Excel file
Finally, execute the Integration Services package by pressing the F5 key. The various components, i.e., the control flow, the data flow, the source table and the target file, turn green. The number of loaded rows is displayed and is correct, with 24 rows of data in the export. The loading process is successful.
6. Check the data exported into the Excel file
After the package execution, open the exported Excel file and check the content, which should match exactly the customers table, i.e., dbo.Customers.
Conclusion on exporting data from SQL Server to Excel using SSIS
This tutorial demonstrates how to export SQL Server data to an Excel file with an SSIS package and Visual Studio 2019. The basic data export is relatively quick and easy to set up. To best manage data types, it is recommended to use file templates that are copied before executing the export task. It is also possible to export a table to a file using the SQL Server import and export wizard.
To go even further, let’s check out how to do the opposite operation, i.e. import an excel file into a MS SQL table.


Be the first to comment