Tutorial to zip files and folders into compressed archives with SSIS and the 7zip software.
First, to zip files with SSIS without script, we need to use the 7zip software in addition to the native components. Indeed, several options are available to the developer for compressing files. For example, it is useful to reduce the size of folders containing text, Excel, or database files. In fact, all types of archive files can be compressed: data files, among other types: .XLS, .XLSX, .CSV, .DOC, .TXT, .DOCX, .XML, .HTML, .PDF, .XLA, .ODS, .JPG, .PNG, etc.
Table of Contents
How to zip files with SSIS and the 7zip software?
This tutorial explains step by step how to compress one or several files in a command line and in an automated way. This package uses a third-party tool, the free and open source compression software 7ZIP. So follow the steps below to proceed, use an existing SSIS package or create a new one into a project. The example below uses the Execute Task Component of SSIS, it allows you to call .bat files with MS-DOS commands or directly Windows executables.
1. Download, install and test 7zip
The 3 following steps are not using SSIS yet, the goal is to make sure the 7zip works outside of the package first.
1.1 Download the 7zip software
To begin with, download the compression software from 7zip.org and install it on the development PC and also on the server if the SSIS package is deployed on another Windows machine.
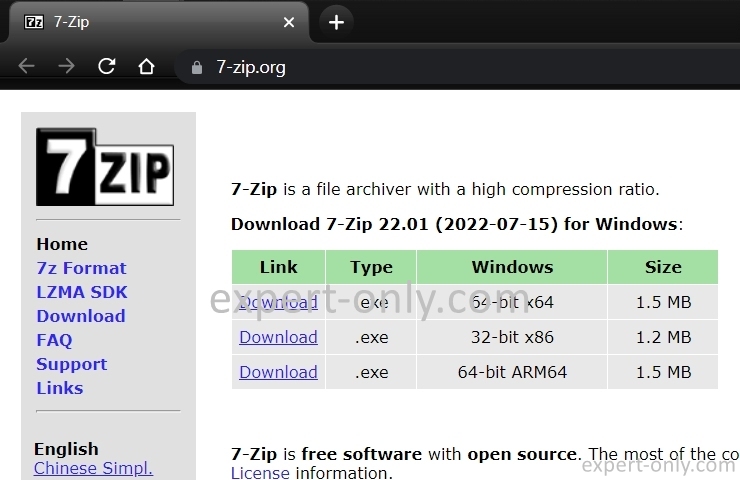
After the installation, the 7-zip executable file, named 7z.exe, is located here:
C:\Program Files\7-Zip\7z.exe
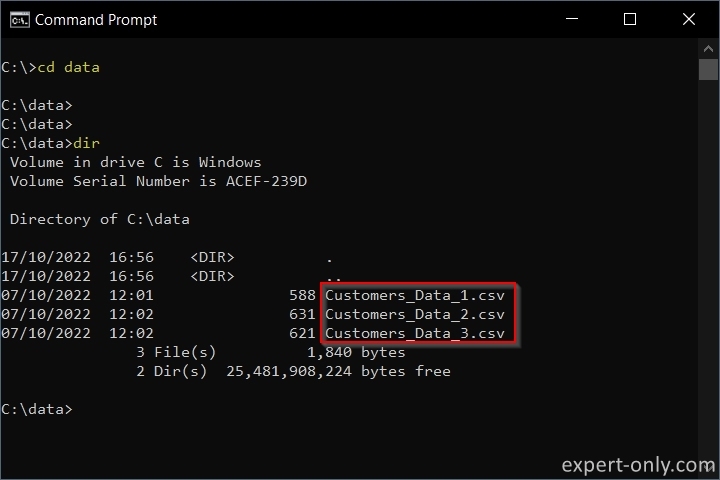
1.2 Prepare the test files to zip
Copy a CSV file to test the MS-DOS command. Here is the example csv file used in this SSIS tutorial.
Download the file, duplicate it and rename the copied files like this, the 3 files are the same, but the name is different:
- Customers_Data_1.csv
- Customers_Data_2.csv
- Customers_Data_3.csv
Go to the folder containing the CSV files. And display the files to be zipped. Like for example C:\data.

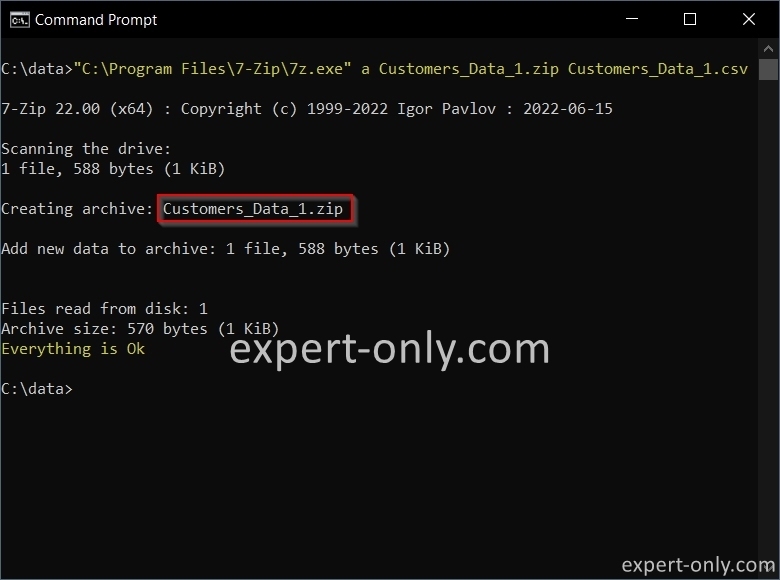
1.3 Zip one file with 7-zip and MS-DOS
Then test the call directly from MS-DOS before using 7-zip from SSIS. Open a Windows command prompt and type these commands.
cd c:\data
dir
Call the executable file 7z.exe to compress the file.
"C:\Program Files\7-Zip\7z.exe" a Customers_Zipped.zip Customers_Data_1.csv
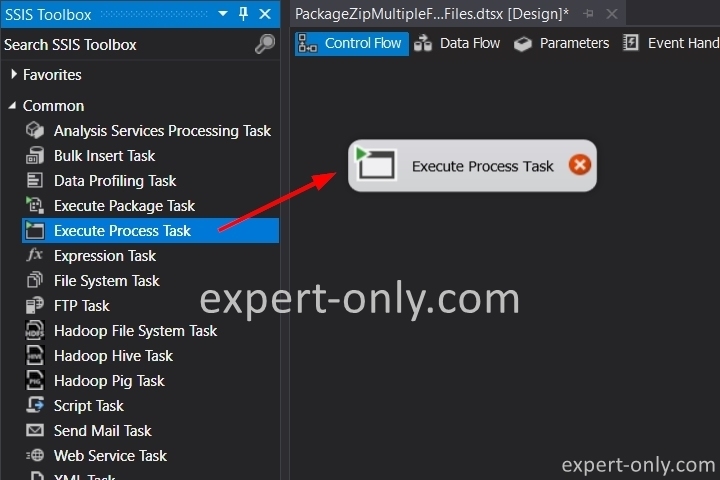
2. Compress a text file with SSIS and 7zip
Now, we know the 7zip software works and it is able to zip files without errors. From Visual Studio, inside an SSIS Control Flow, add the Execute Process Task.
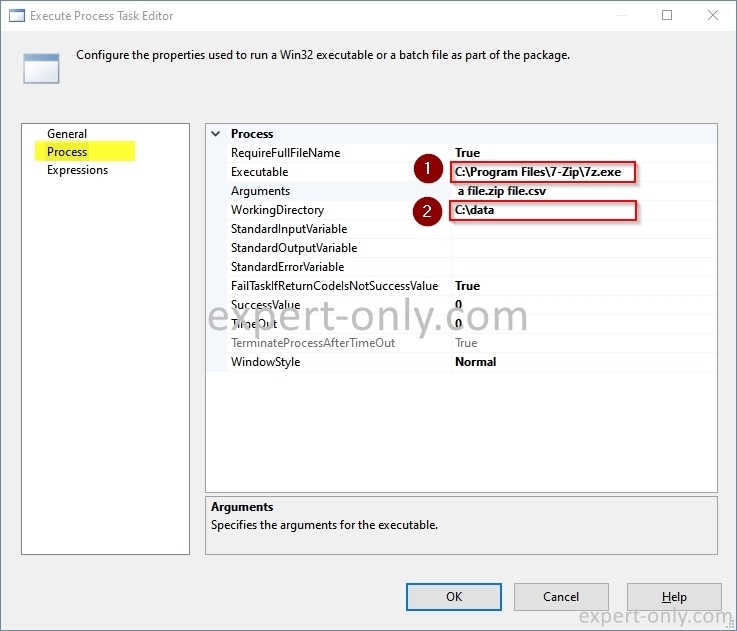
This first option is done through a simple MS-DOS command call. Write the hard-coded parameters directly inside the SSIS Execute Process Task component in the control flow. To set up the component, go to the Process tab, enter the following values:
- Executable: C:\Program Files\7-Zip\7z.exe
- Arguments: a Customers_Zipped.zip Customers_Data_1.csv
- WorkingDirectory: C:\data
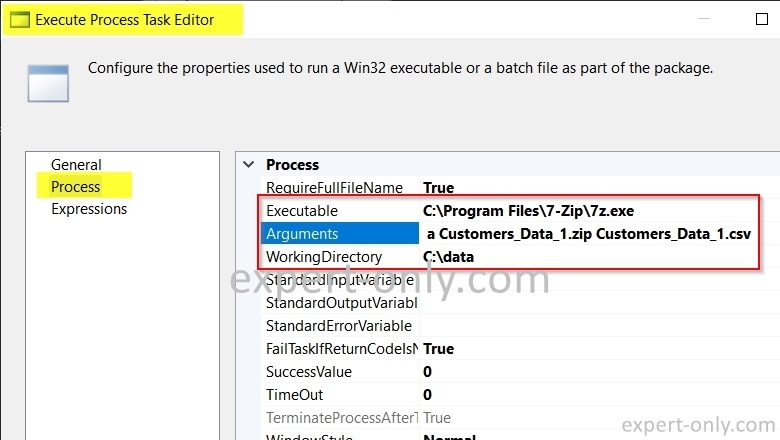
This command calls the 7z.exe utility directly from its location on the PC. The SSIS task can also use another MS-DOS command line compatible tool. Of course, the options are configurable, and it is possible to choose the compression mode and format. Finally run the task to compress the files.
3. SSIS package to compress multiple files into one archive
In the same way, it is possible to add several files to the same ZIP archive, using a filter as an argument rather than the full file name. To do this, simply replace the Arguments parameter of the process execution task:
- Arguments: a Customers_Zipped.zip Customers_*.csv
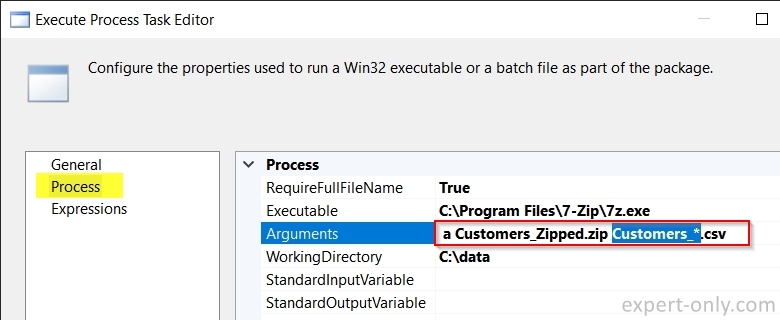
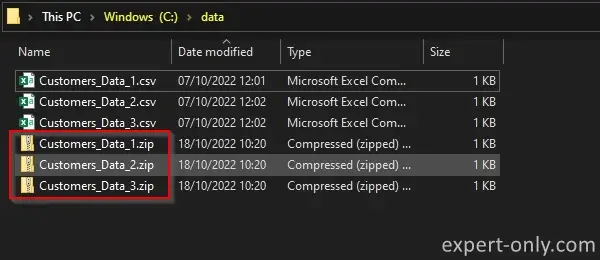
All files with a CSV extension are compressed in the same zip archive. The result after running the two variants with two zip files:
- Customers_Data_1.zip: contains only one compressed file
- Customers_Data_1.csv
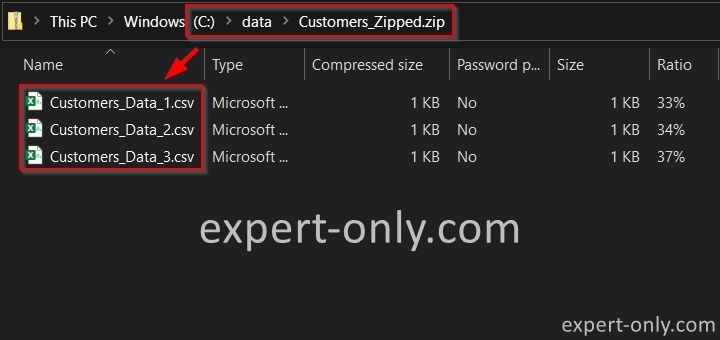
- Customers_Zipped.zip: contains all three compressed files:
- Customers_Data_1.csv
- Customers_Data_2.csv
- Customers_Data_3.csv
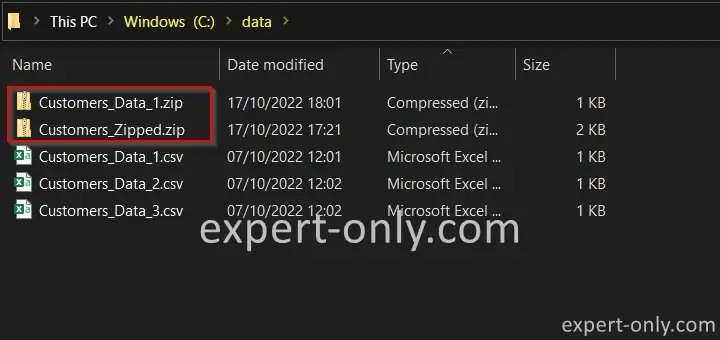
The Customers_Zipped.zip file contains the 3 files with the CSV extension in the source folder C:\data. When clicking on the archive, the 3 files are listed.
4. Zip each files into a separate archive with SSIS
It is also possible to dynamically compress all the files in a folder without knowing the name. In this case, use the extension of the source file or a filter on the name of the files to be processed. In this simple example, only the name of the file to be compressed is stored in a variable, as well as the timestamp, i.e., the date and time.
The aim is to create, for example, an archive for each file, while keeping the original name. This is done by integrating the SSIS process execution task into a file loop, the same principle that is used to import CSV files into a SQL database dynamically.
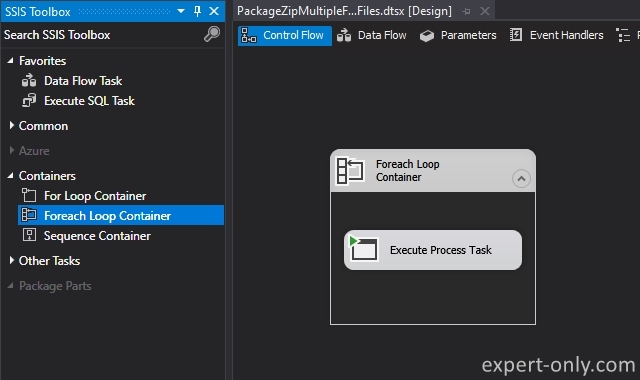
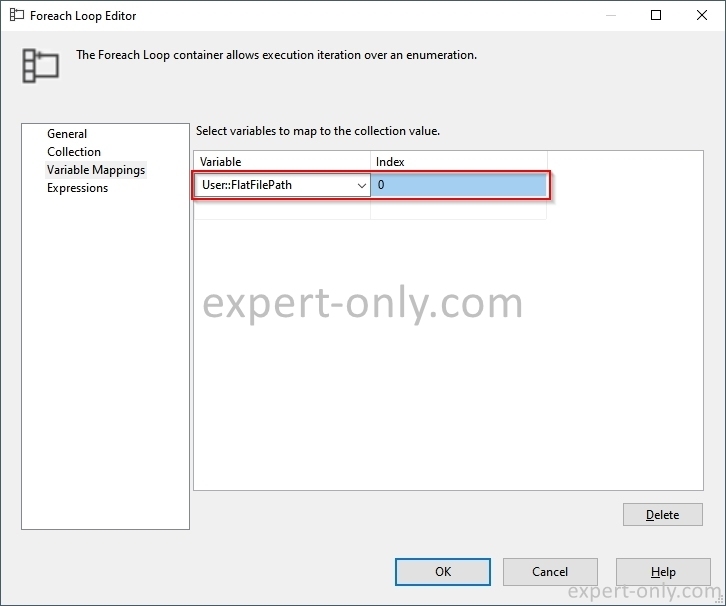
4.1 Set-up the loop and create two variables
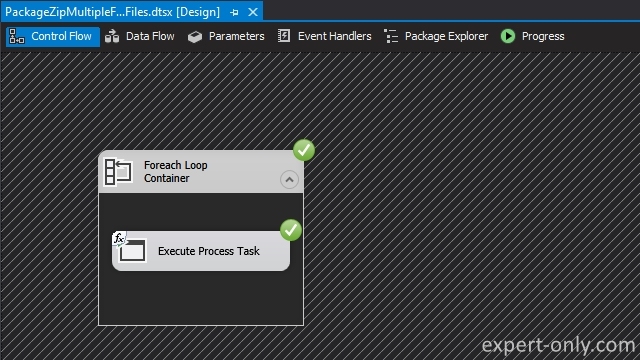
Into the control flow, add a Foreach Loop Container, and add an Execute Process Task inside the loop.
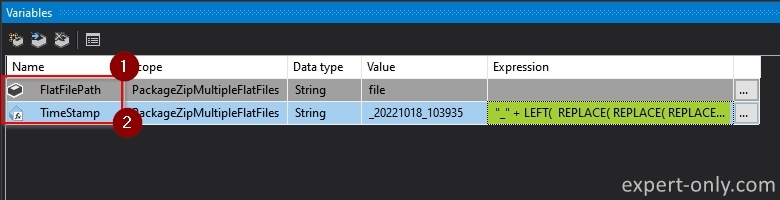
Create two SSIS variables to dynamically store the name of the file to be compressed, and the current date and time to manage the automatic time stamp in the ZIP file name. To display the variables, right-click on the package workspace and select Variables.
- FlatFilePath : variable used from the loop on files and passed to the SSIS compression task : indicate as hard value : file
- TimeStamp : variable created with an expression to dynamically generate a Timestamp, its formula is the following, it will be used later in the tutorial
"" + LEFT( REPLACE( REPLACE( REPLACE( (DT_WSTR,30) GETDATE(), "-", ""), ":", ""), " ", ""), 15)
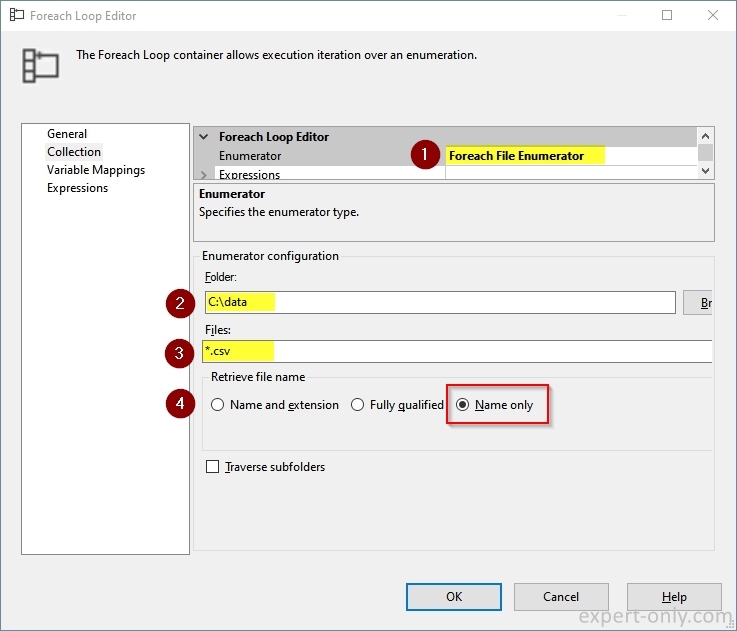
Configure the loop with the Foreach File Enumerator component. Open the container and set it up like this:
- Choose the type: Foreach File Enumerator
- Specify the working folder: C:\data
- Write the filter to select CSV extensions only: *.csv
- Choose the option to save the file name without the extension: Name only
Now map the filename value from the loop to the variable. This is the most important step as it is this link between the loop and the SSIS task that makes the package dynamic.
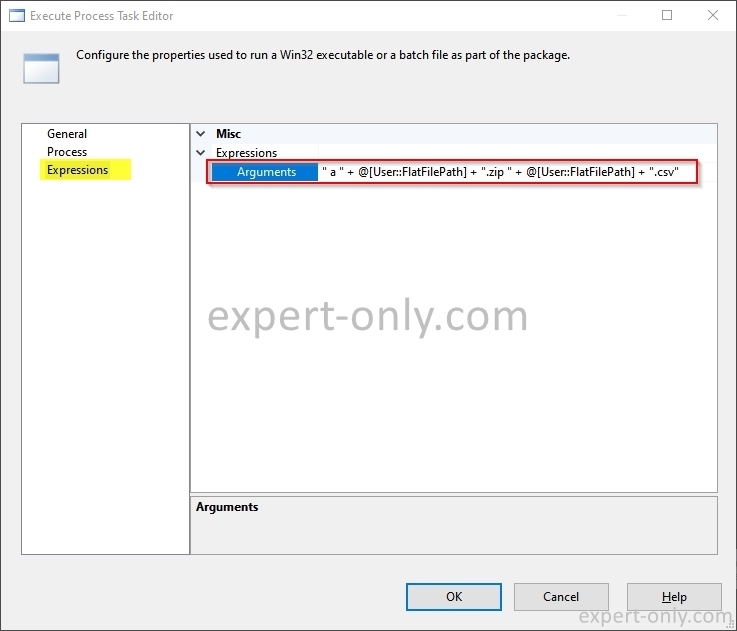
4.2 Configure the process execution task to call 7zip
Open the SSIS task to run the processes and set only the two arguments like this. The arguments field remains empty, to be set in the next step.
- Executable: C:\Program Files\7-Zip\7z.exe
- WorkingDirectory: C:\data
Then, from the Expressions tab, select arguments from the drop-down list and fill in this formula. This formula indicates that each detected file is compressed into a zip archive with the same name as the original file. Customers_Data_1.csv thus becomes Customers_Data_1.zip.
" a " + @[User::FlatFilePath] + ".zip " + @[User::FlatFilePath] + ".csv"
4.3 Run the package to zip the files
Finally, run the package to compress each file into a ZIP archive.
The result after compression is a ZIP file for each text file in the folder.
5. Compress and add current time to archive names
On the other hand, to compress the same files and change the name with the current date and time, now use the second variable. Edit the Arguments expression of the task again and simply add the dynamic TimeStamp variable as follows to add the suffix:
" a " + @[User::FlatFilePath] + @[User::TimeStamp] + ".zip " + @[User::FlatFilePath] + ".csv"

The result after a second execution of the package is the following, for example the Customers_Data_1.csv file is compressed in the Customers_Data_1_20221018_104229.zip archive. The format used is the date format YYYYMMDD_HHMMSS.
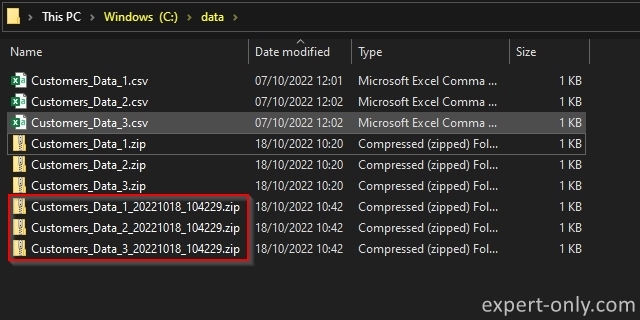
As per the screenshot above, the package generates 3 zip archives, i.e., one archive per CSV available in the folder.
6. Display the list of all 7zip options
In addition, the full list of 7zip commands and options is available at the command line. To do this, type 7z-h inside an MS-DOS window. Here is the list of all 7zip options.
7z-h
Conclusion on zipping files with SSIS
In conclusion, this tutorial explains how to compress files in ZIP format with SSIS, Visual Studio and 7zip called from the command line. Other options are also possible such as storing folder names in variables. It is also possible to manage and deploy SSIS packages from the command line.


Hola una consulta como seria si mientras voy compriendo voy eliminando los .bak u otro forech que cuando termine elimine los .bak
Hi Fabian,
I translate to English as the original article is in English:
“Hi, I have a question, how would it be if while I’m compiling I delete the .bak or another forech (foreach i suppose) that when I finish I delete the .bak.”
I do not understand exactly the question, I suppose you are deleting .bak database backup files using a ForEach loop. But it is recommended to deleted them in the loop and to do not access them during the delete. Otherwise you will have read access errors.
Let me know if that help you. You can detail the use case.
Y.